21 DIY Cheap Walkway Ideas to Transform Your Outdoor Space
Creating a beautiful and functional walkway in your garden or yard doesn’t have to break the bank. With a bit of creativity and some inexpensive materials, you can design a stunning path that enhances your outdoor space.
Here are 21 DIY cheap walkway ideas to inspire your next project:
1. Gravel Pathway
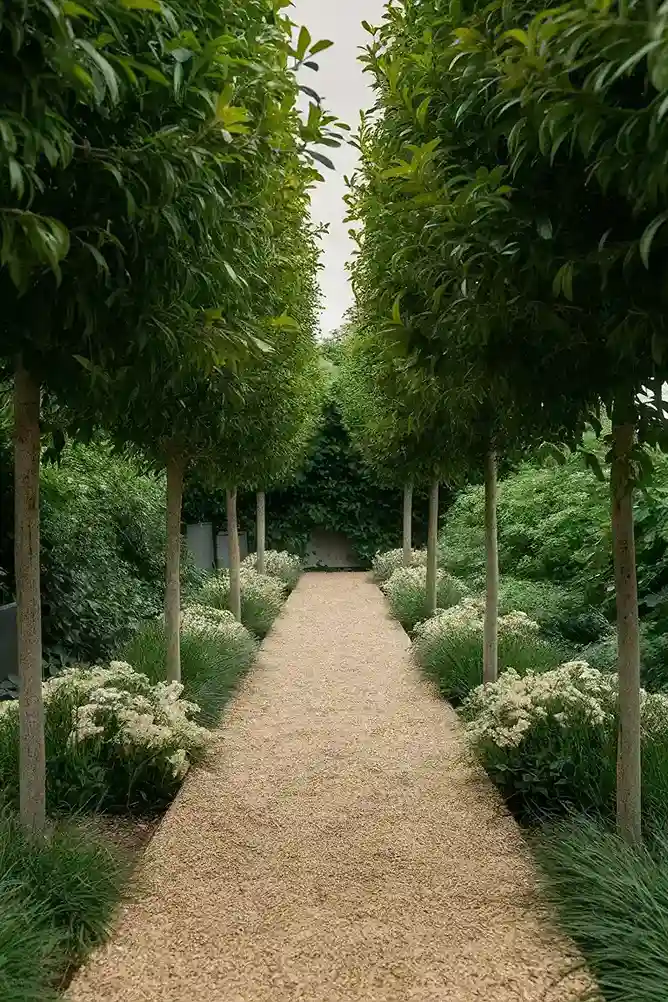
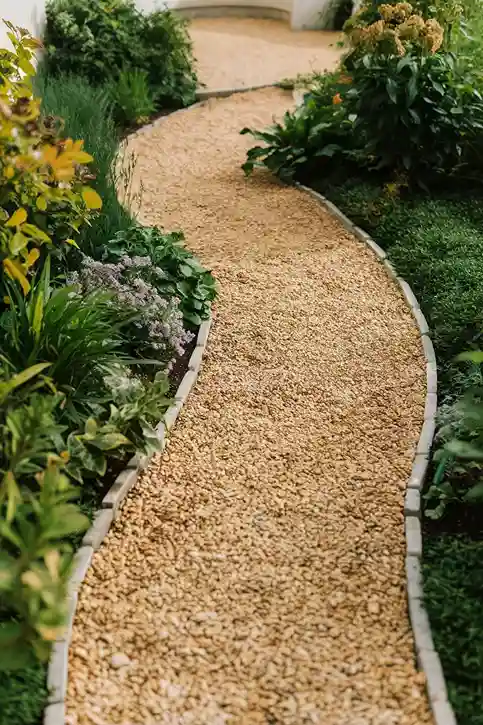
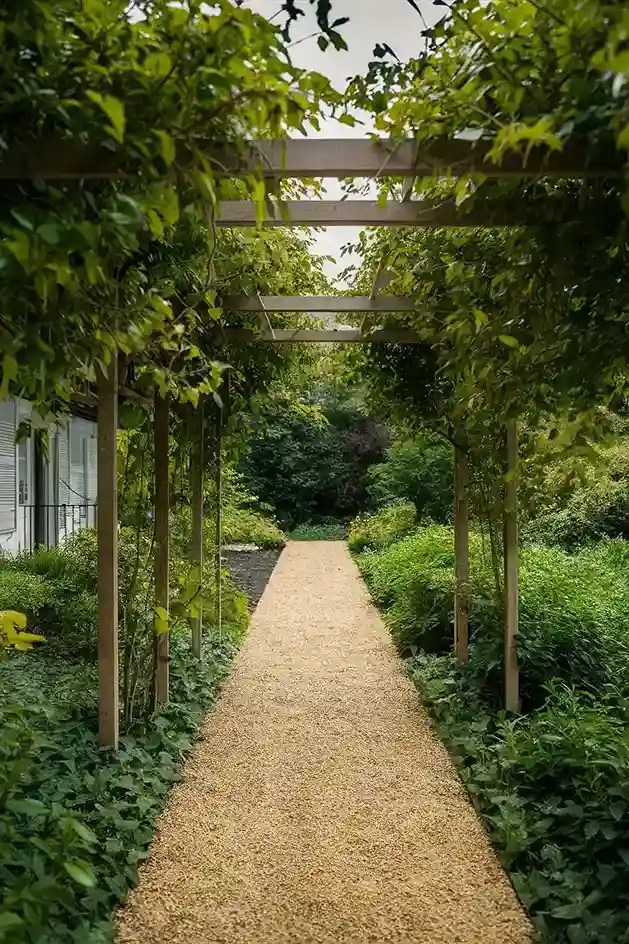
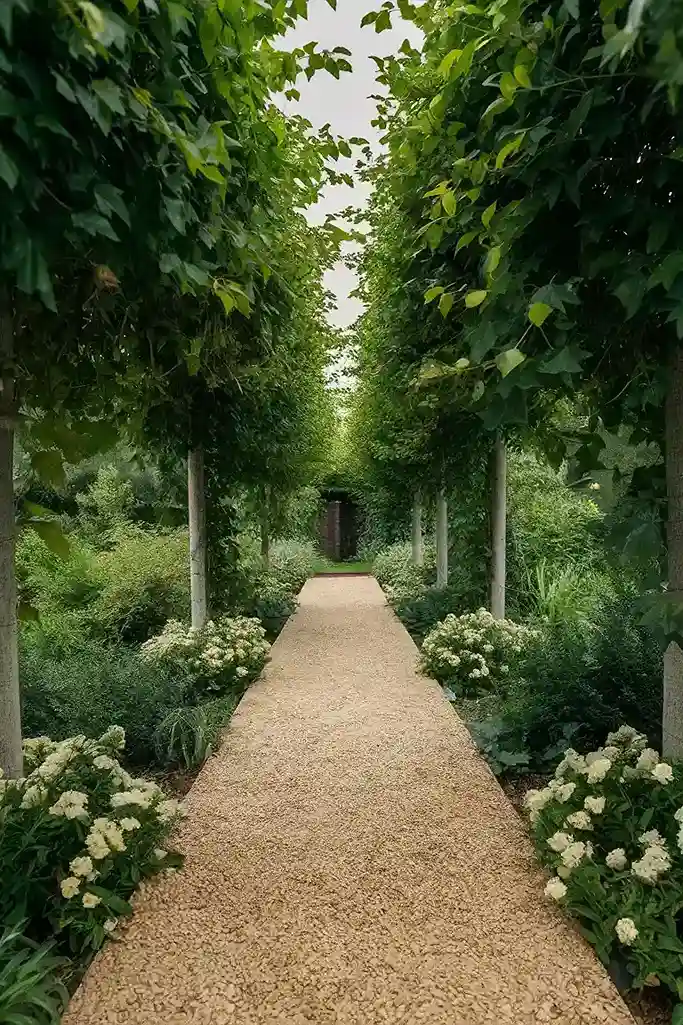
Why Choose Gravel?
Gravel is an affordable and easy-to-install option for a walkway. It provides excellent drainage and can be refreshed easily.
How It Looks:
A gravel pathway offers a clean, minimalist look that blends seamlessly with various garden styles. The small stones create a crunching sound underfoot, adding an auditory element to your garden experience.
How to Install:
- Outline your path using stakes and string.
- Remove the grass and topsoil to a depth of about 4 inches.
- Lay down a weed barrier fabric to prevent weed growth.
- Spread a 2-inch layer of crushed stone or gravel base.
- Add a 2-inch layer of gravel on top and level it out.
2. Mulch Walkway
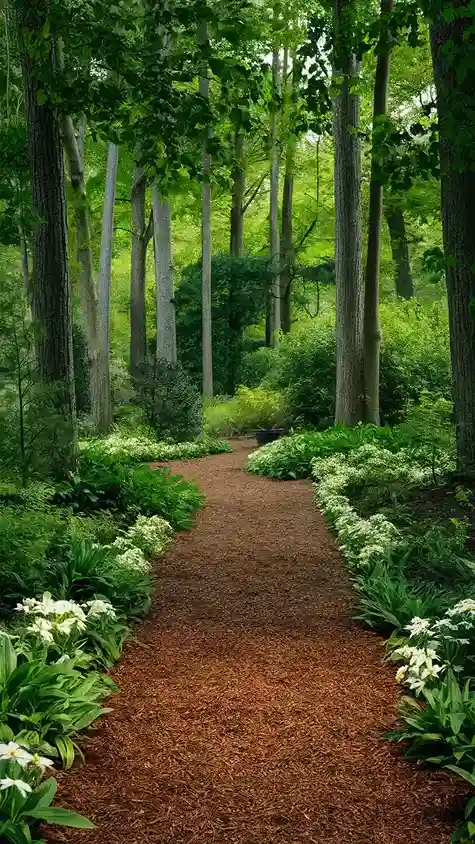
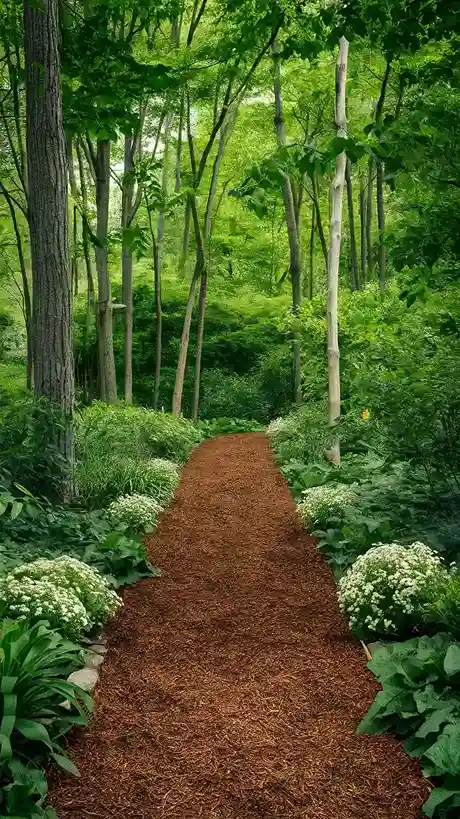
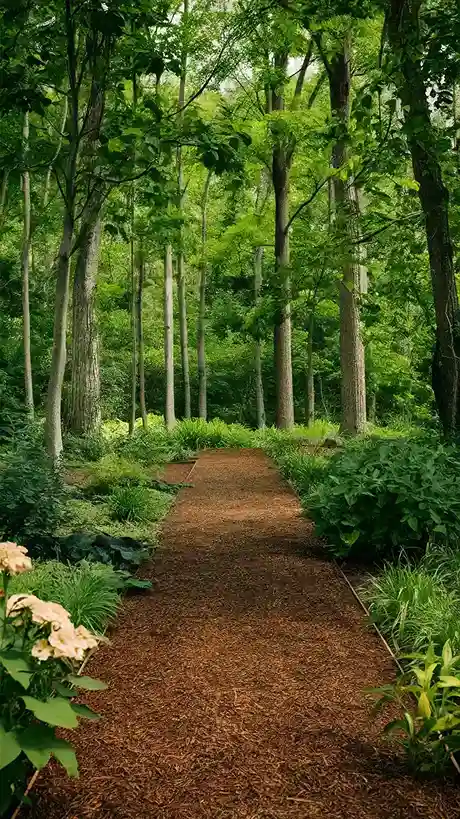
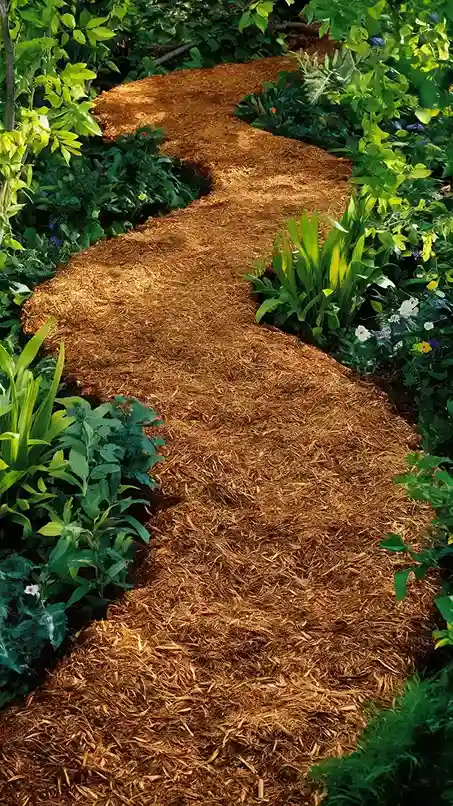
Why Choose Mulch?
Mulch is a budget-friendly material that creates a natural-looking path. It’s easy to spread and can be refreshed annually.
How It Looks:
A mulch walkway has a soft, earthy appearance that complements a woodland or natural garden setting. The rich, dark color of the mulch contrasts beautifully with green plants and flowers.
How to Install:
- Outline your path and remove the grass.
- Lay down a weed barrier fabric.
- Spread a 3-inch layer of mulch evenly over the path.
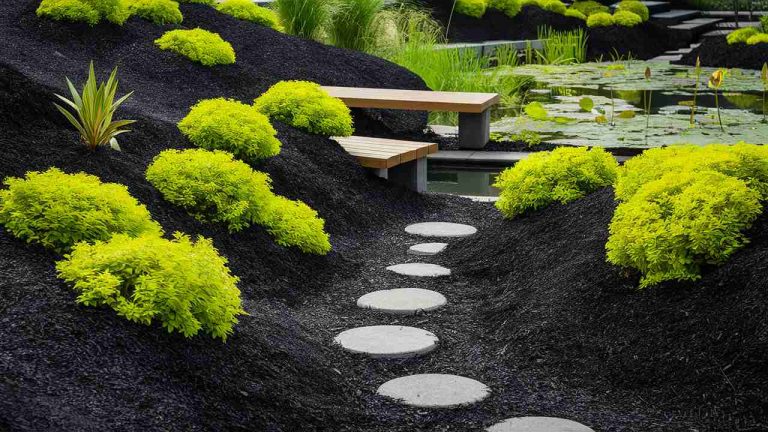
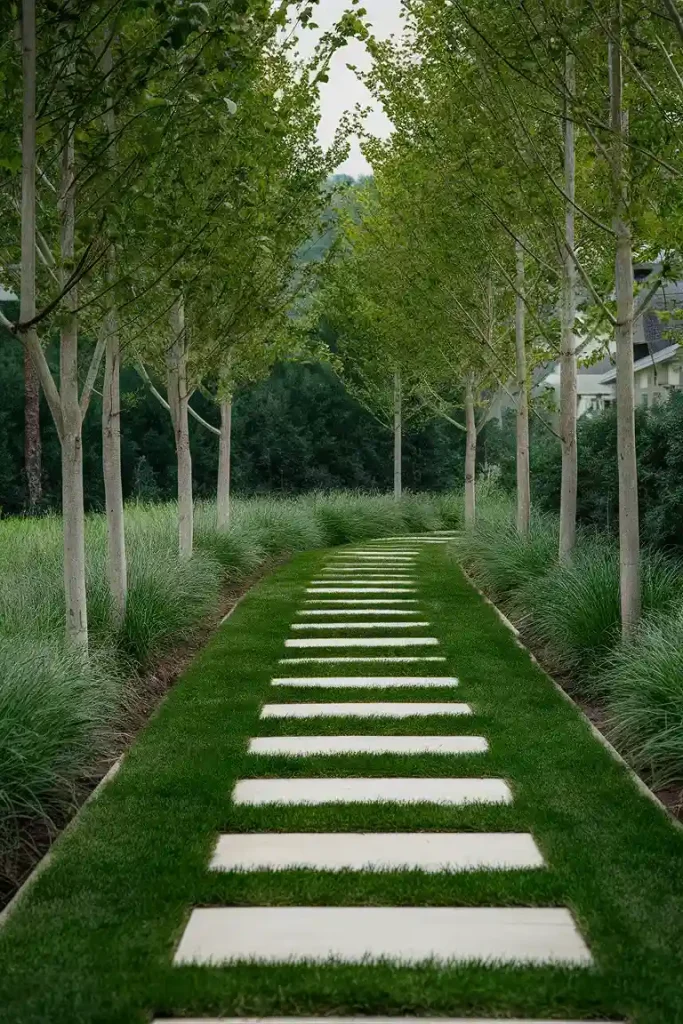
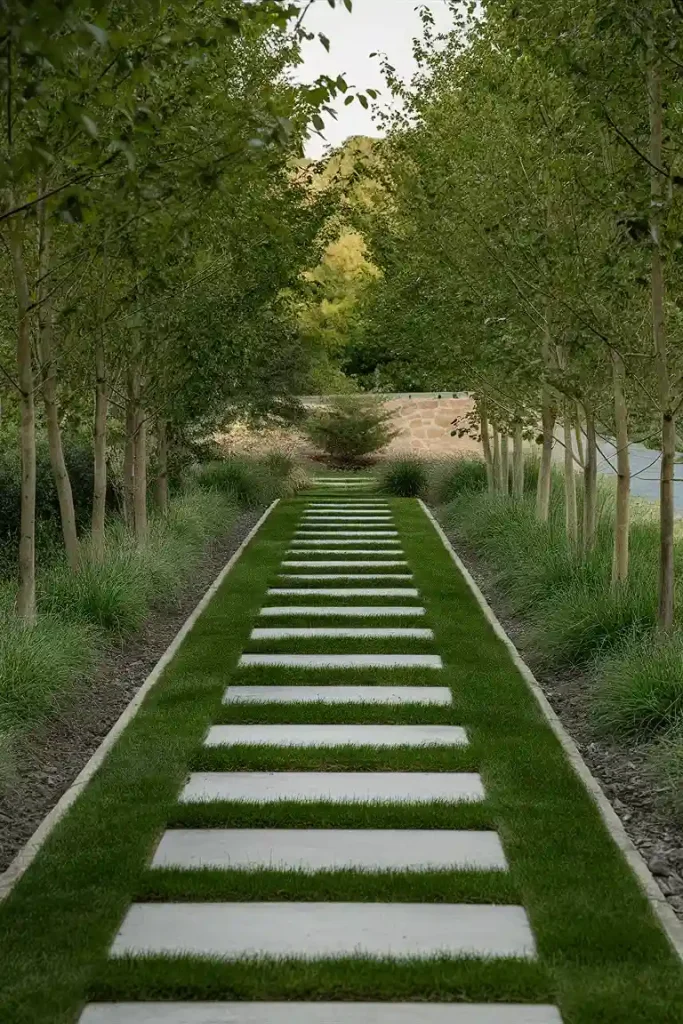
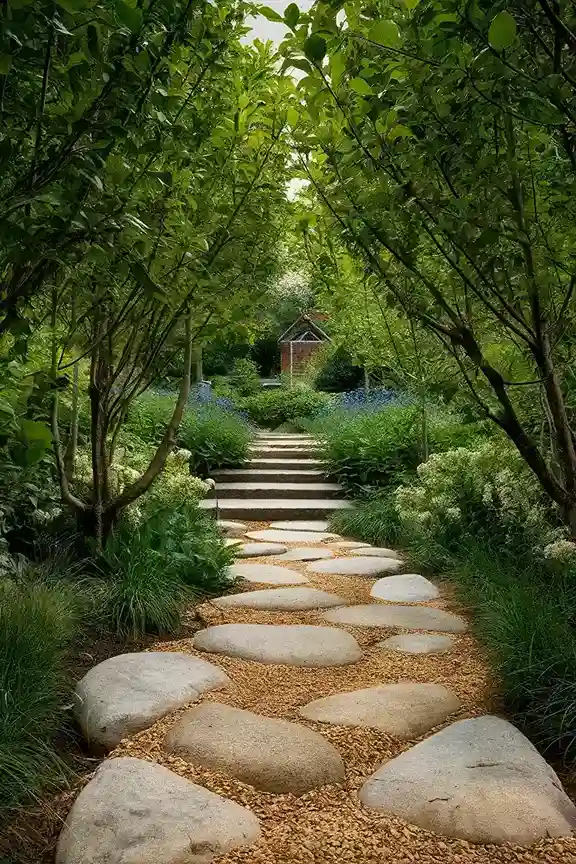
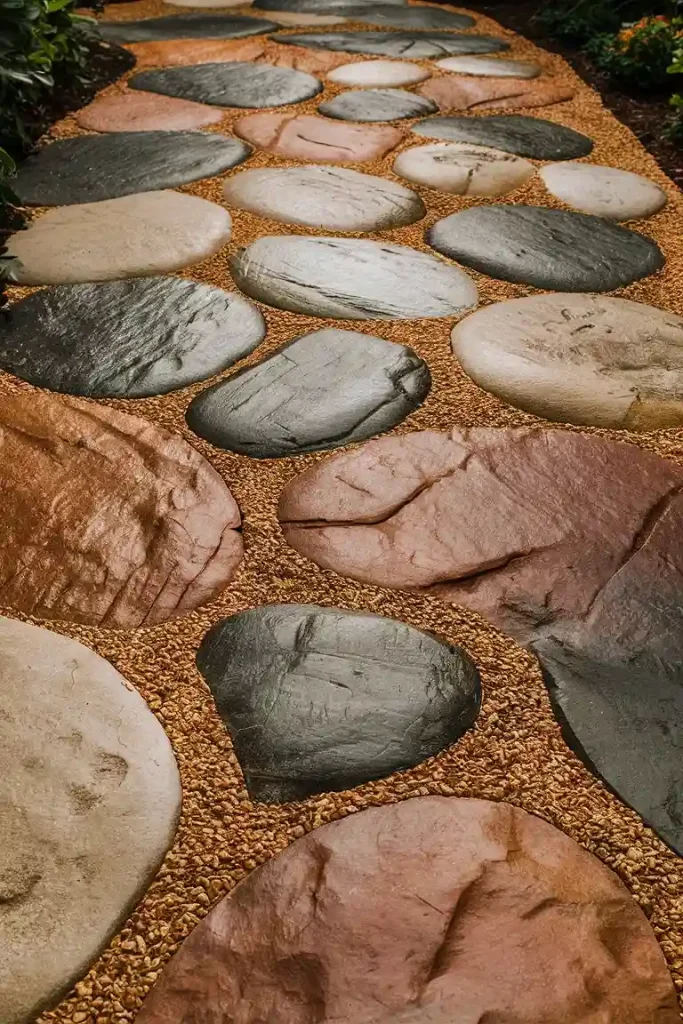
3. Stepping Stones
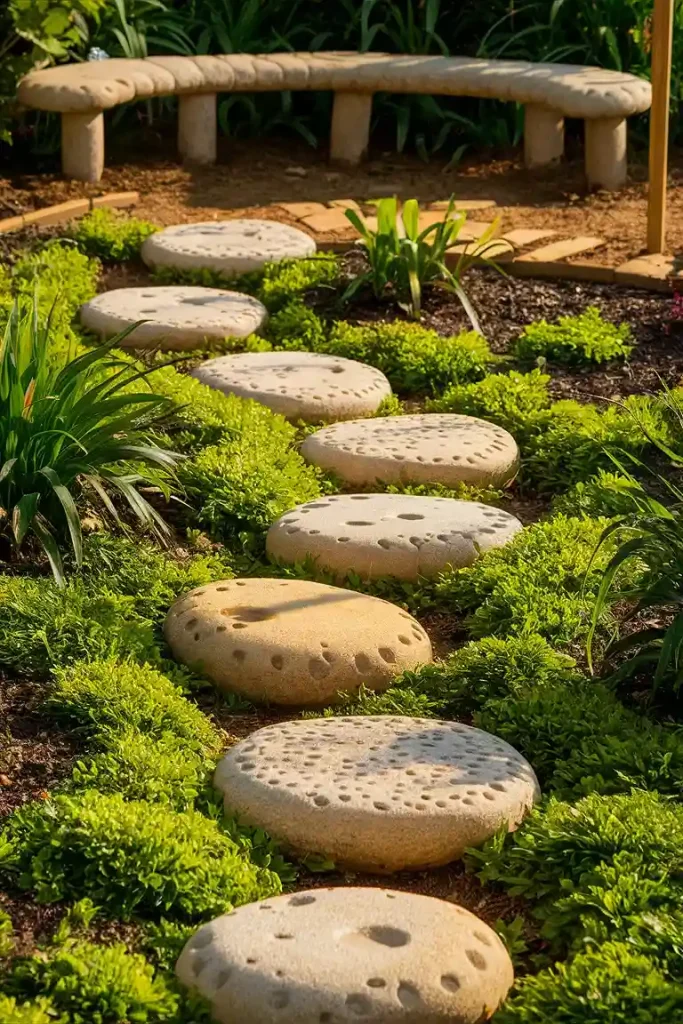
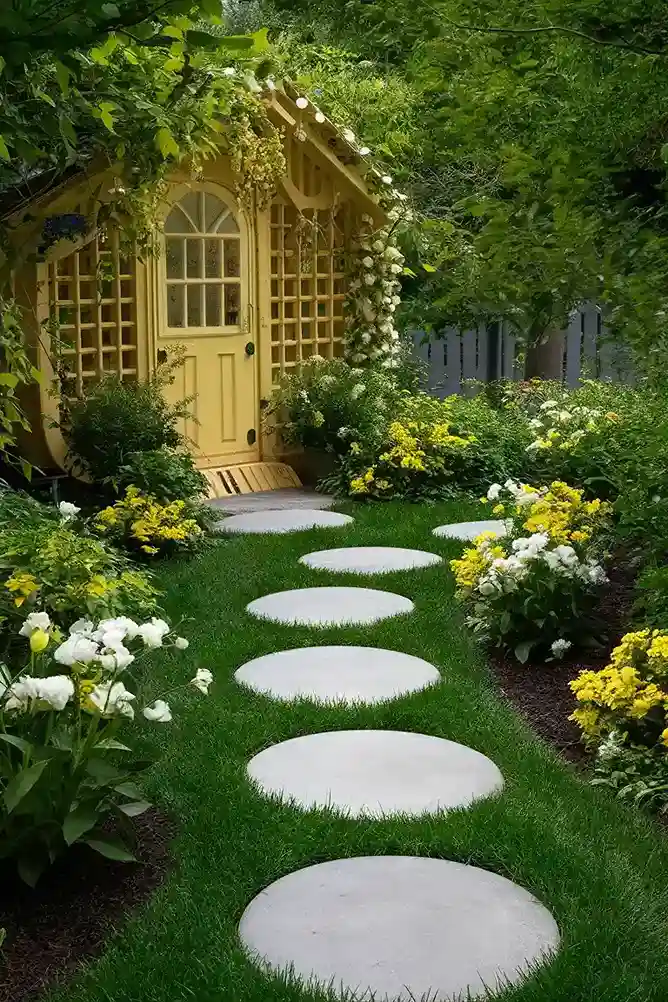
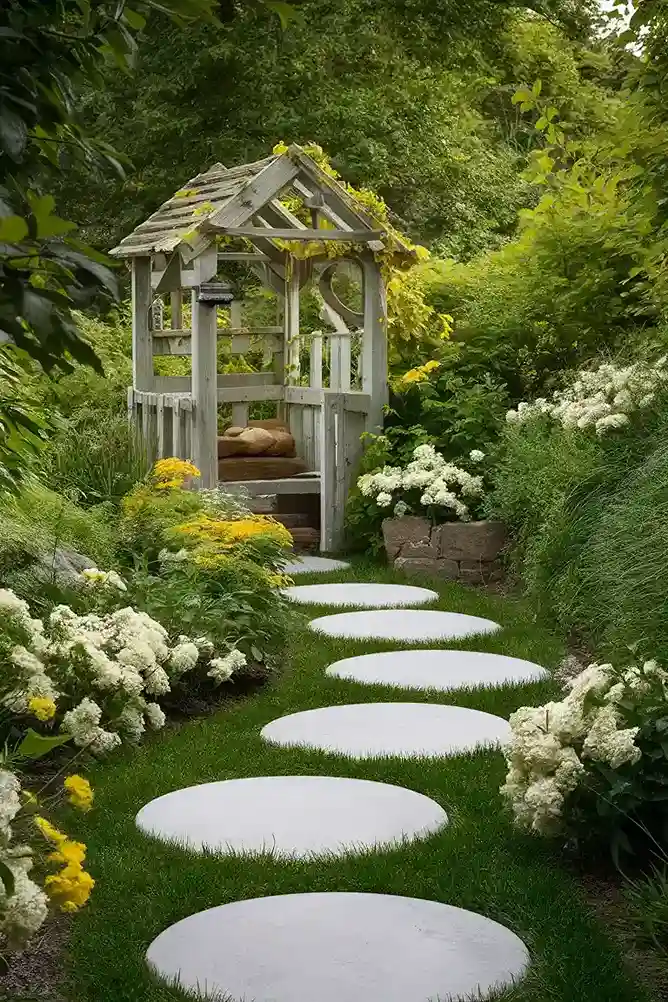
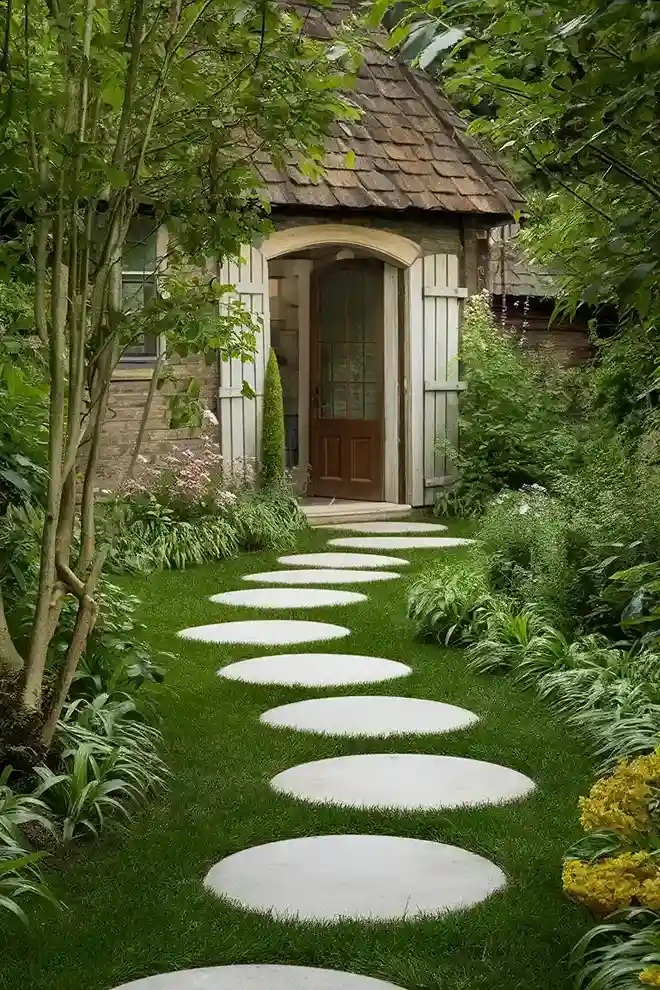
Why Choose Stepping Stones?
Stepping stones add charm and can be made from concrete or natural stone. They are easy to install and customizable.
How It Looks:
Stepping stones create a whimsical, storybook feel in your garden. The stones can be spaced out to allow grass or ground cover to grow between them, adding a lush, green backdrop.
How to Install:
- Plan the placement of your stepping stones.
- Dig out the soil where each stone will go, about 2 inches deep.
- Place the stones and ensure they are level.
- Fill gaps with gravel, mulch, or ground cover plants.
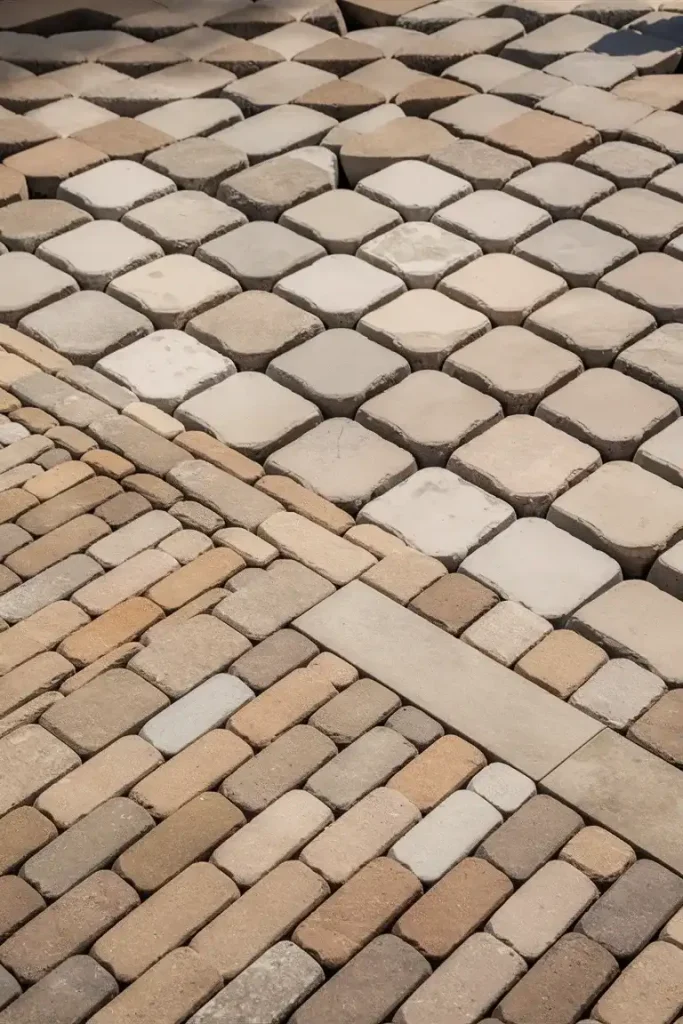
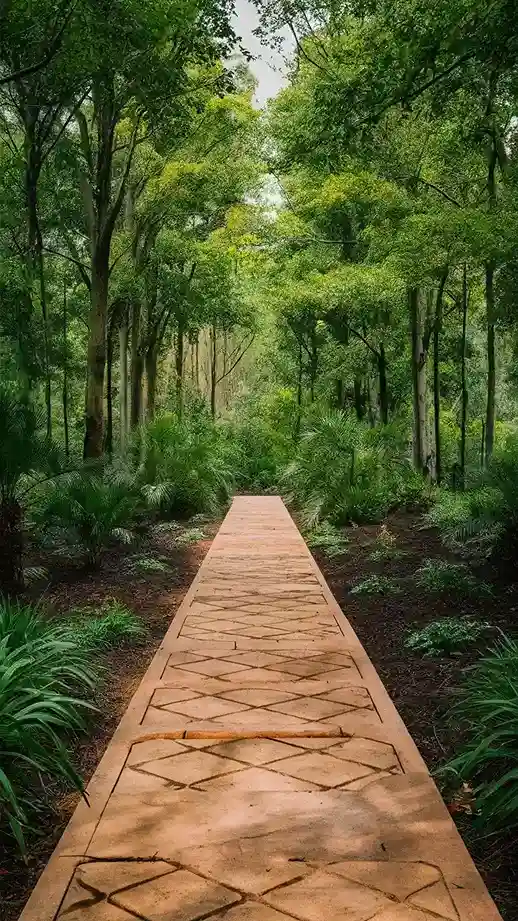
4. Brick Path

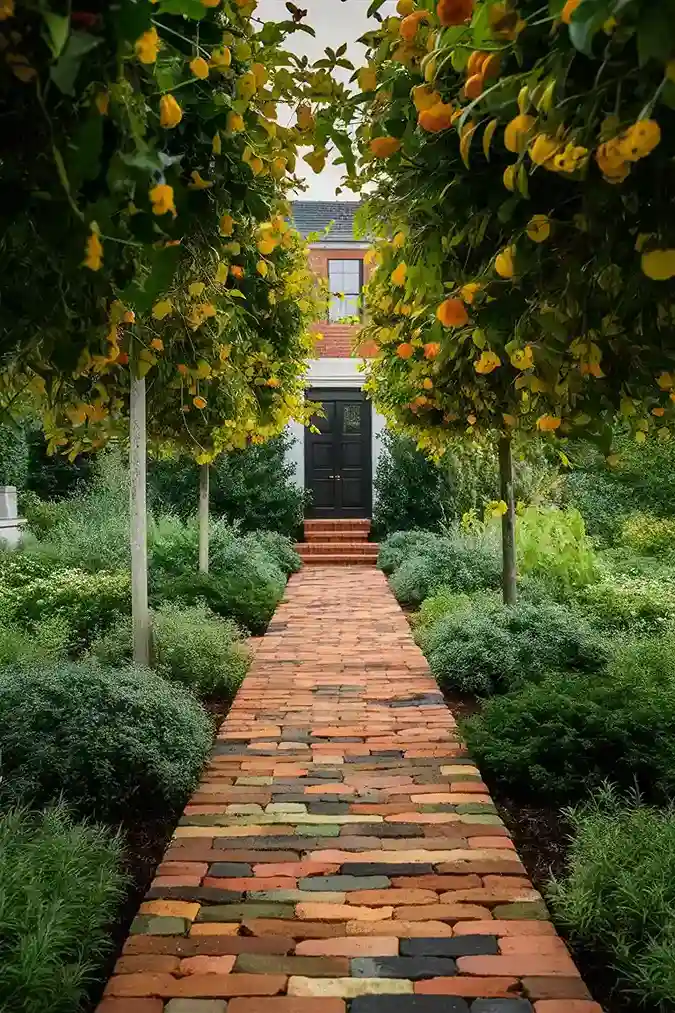
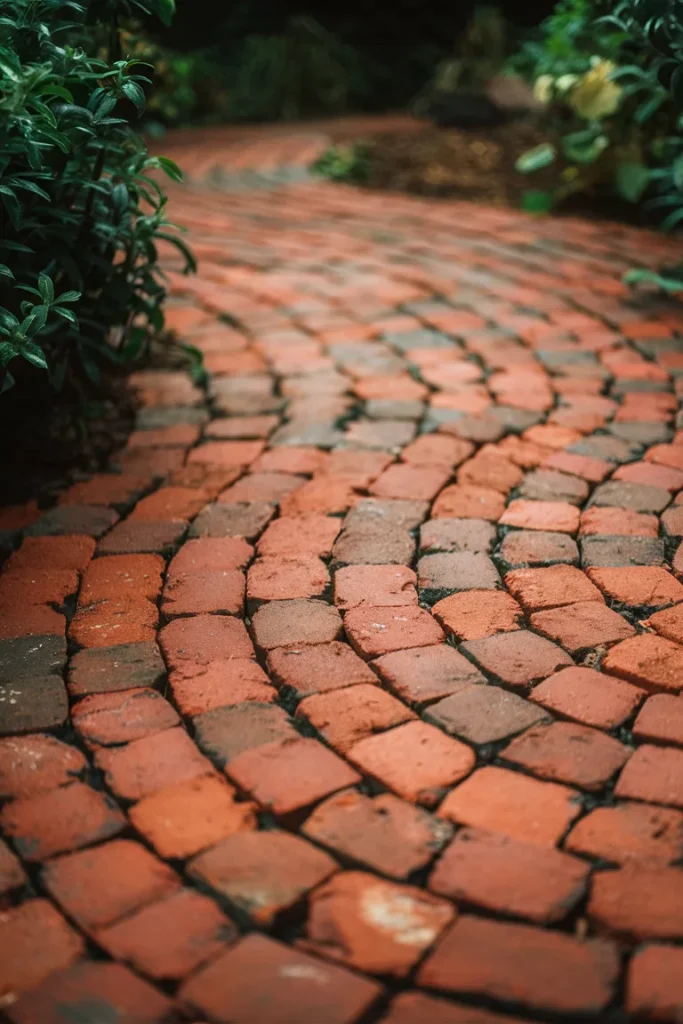
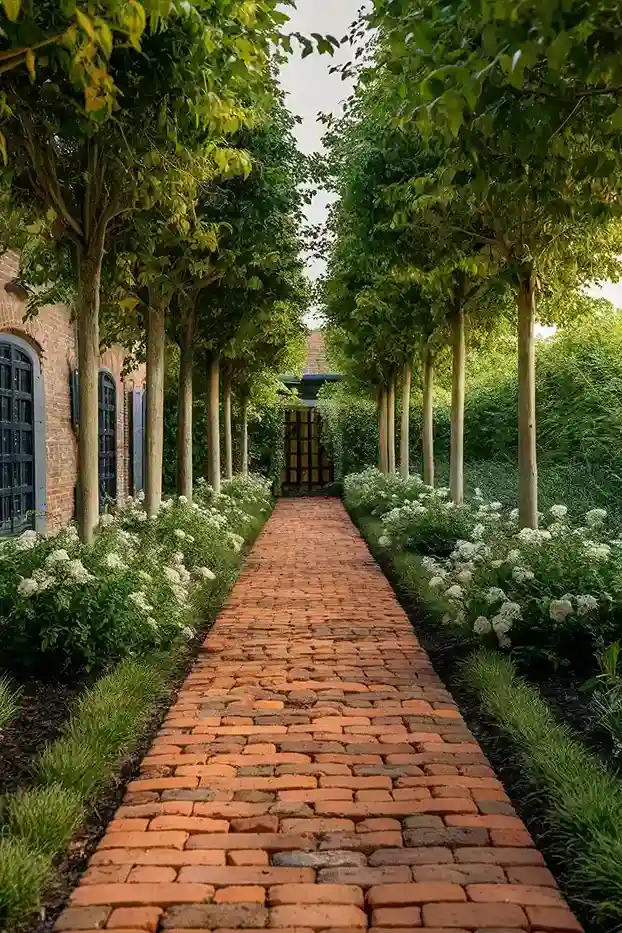
Why Choose Brick?
Reclaimed bricks are cost-effective and can be arranged in various patterns to create a classic and durable walkway.
How It Looks:
A brick path exudes timeless elegance and charm. The warm, reddish hues of the bricks add a touch of rustic sophistication to any garden.
How to Install:
- Outline your path and remove the grass.
- Lay a 2-inch layer of sand as a base.
- Arrange the bricks in your desired pattern.
- Fill gaps with sand and compact the bricks.
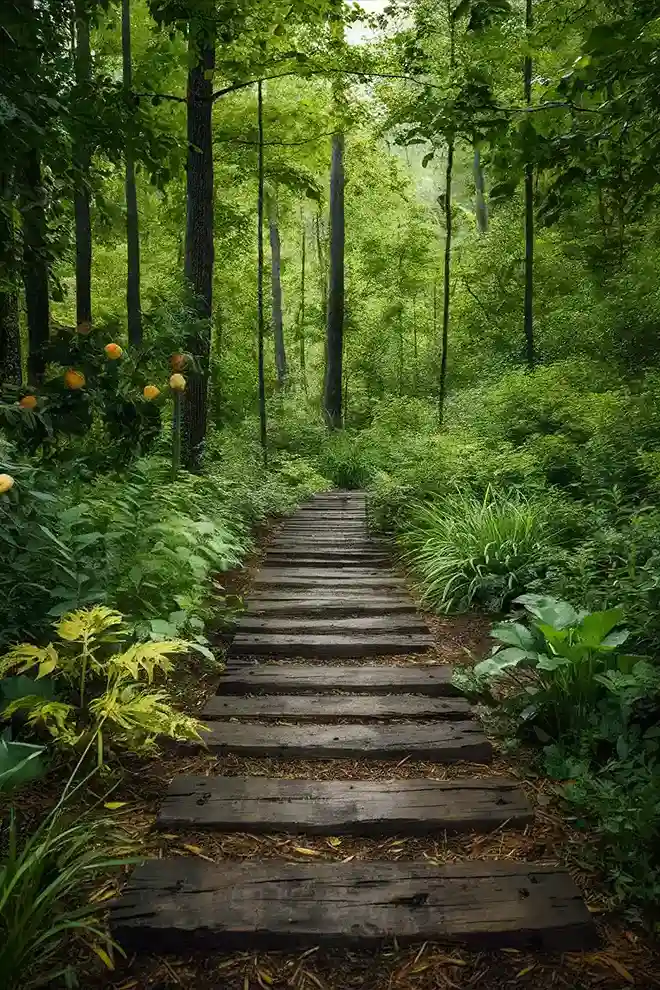
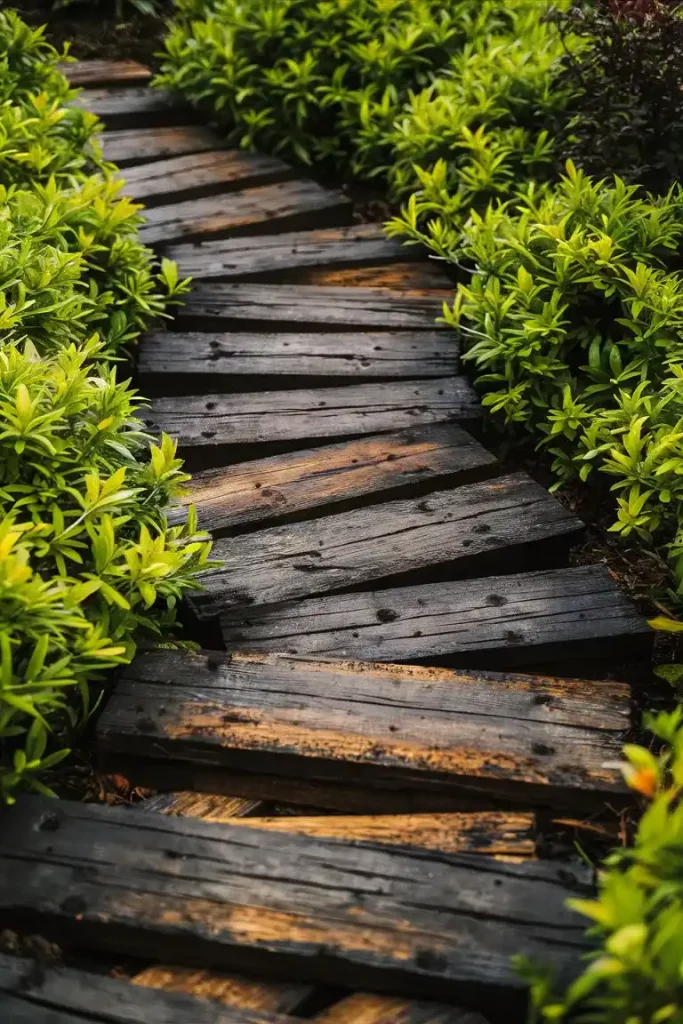
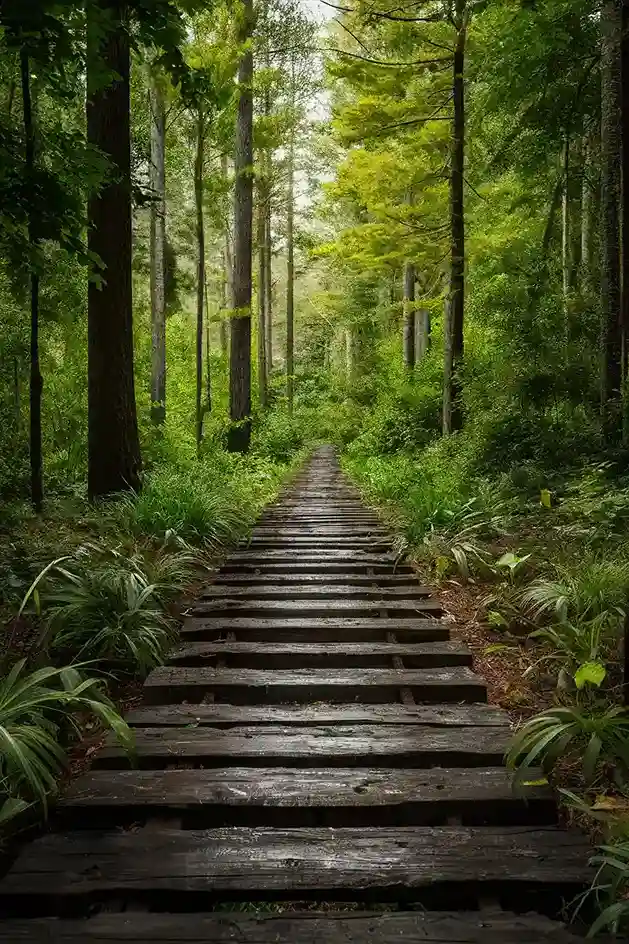
5. Pallet Wood Path
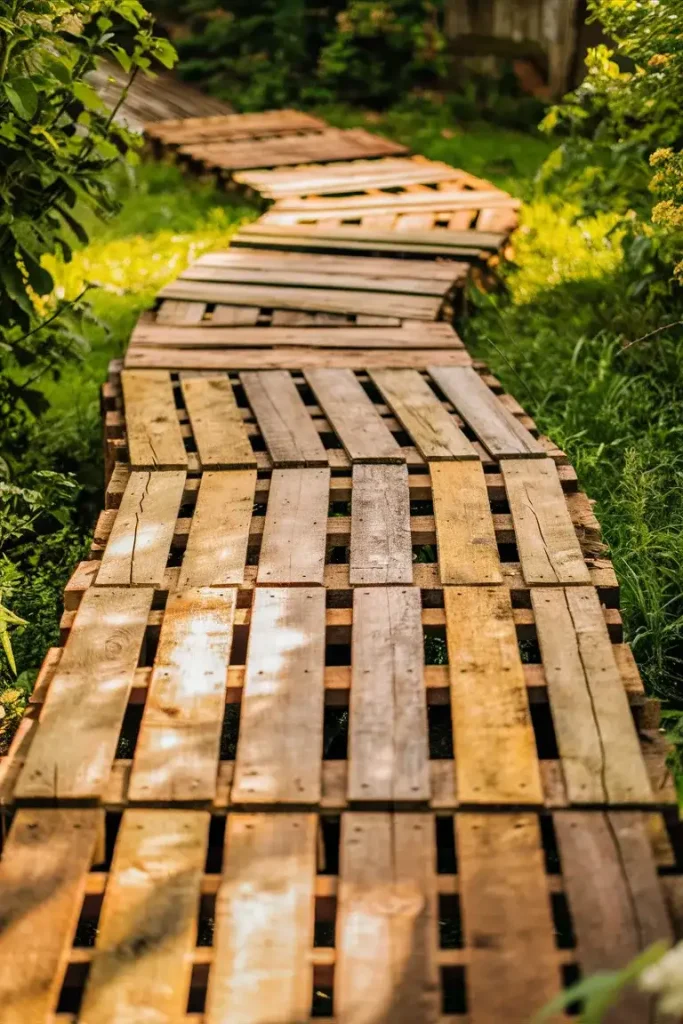
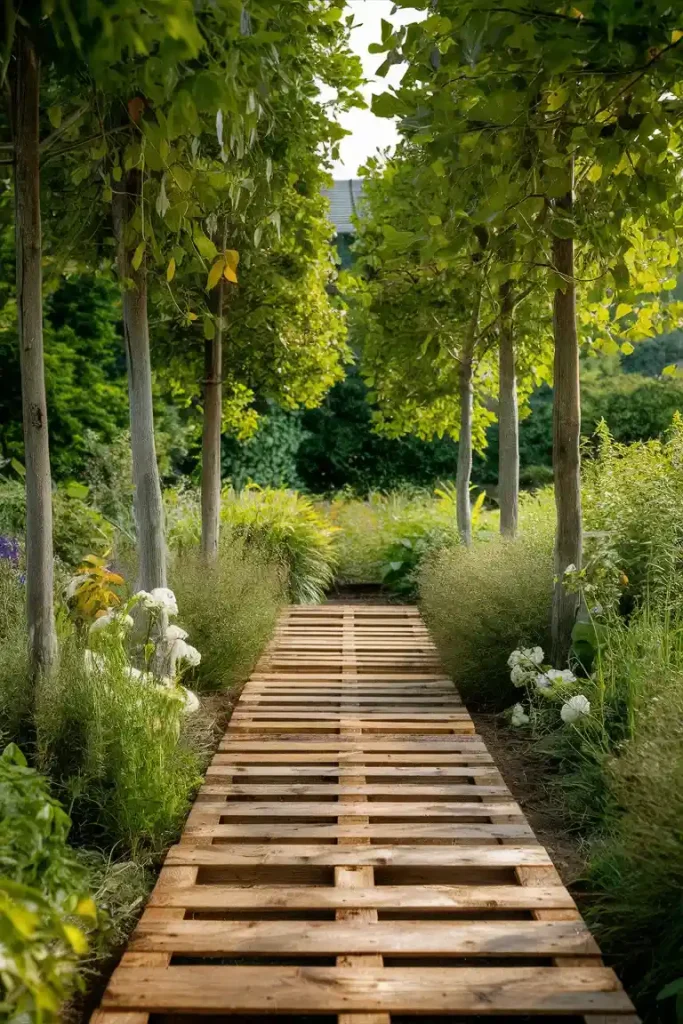
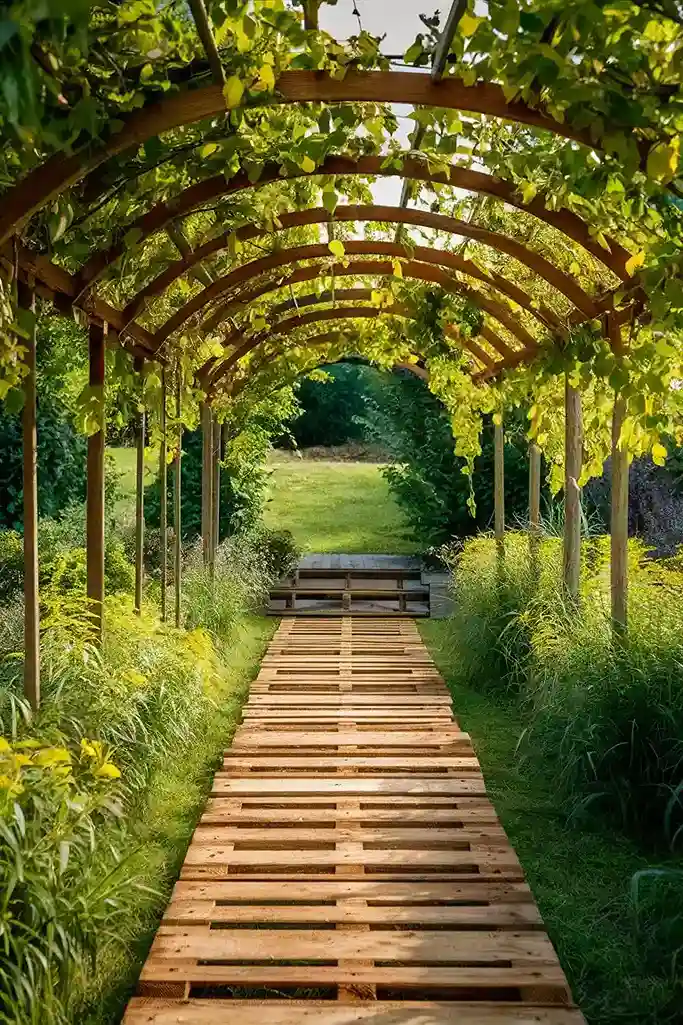
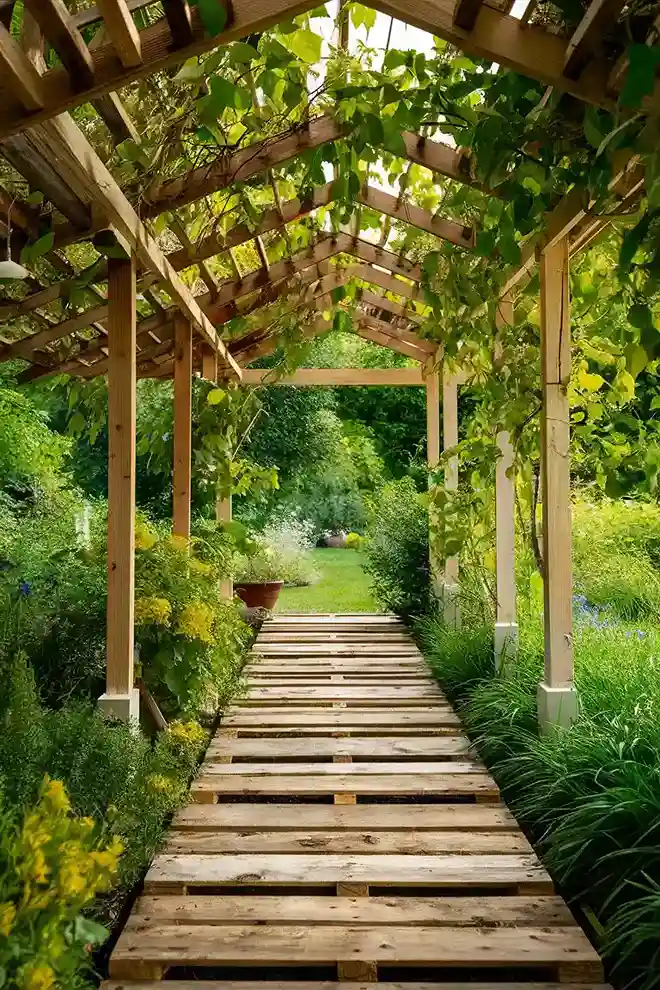
Why Choose Pallet Wood?
Repurposing old wooden pallets is eco-friendly and creates a rustic wooden path.
How It Looks:
A pallet wood path has a charming, rustic appeal. The weathered wood adds character and a sense of history to your garden.
How to Install:
- Dismantle the pallets and treat the wood to protect it from the elements.
- Lay the planks on a leveled ground.
- Secure the planks with stakes or screws.
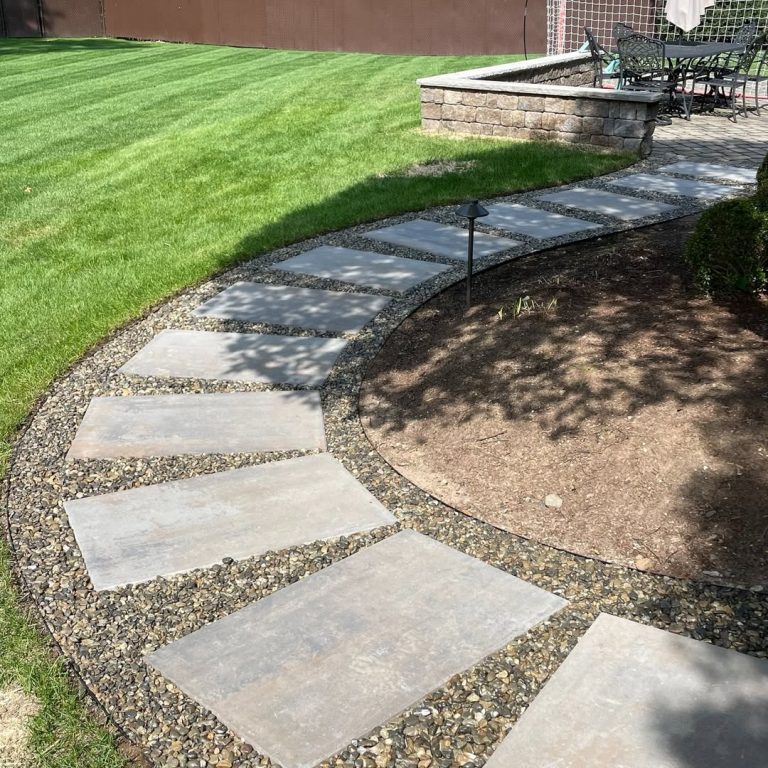
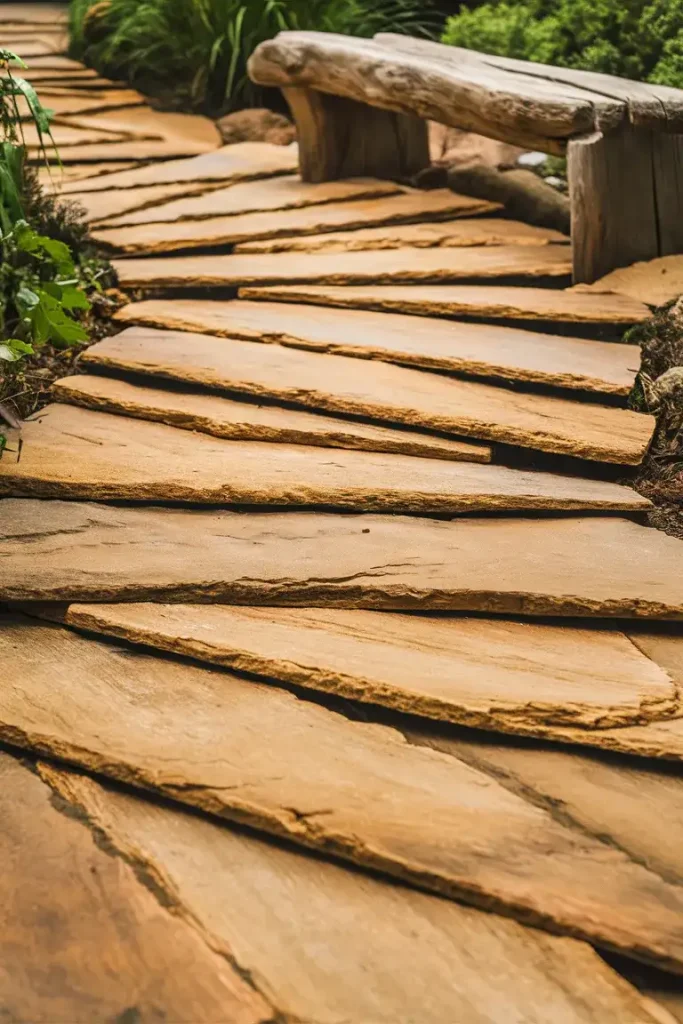
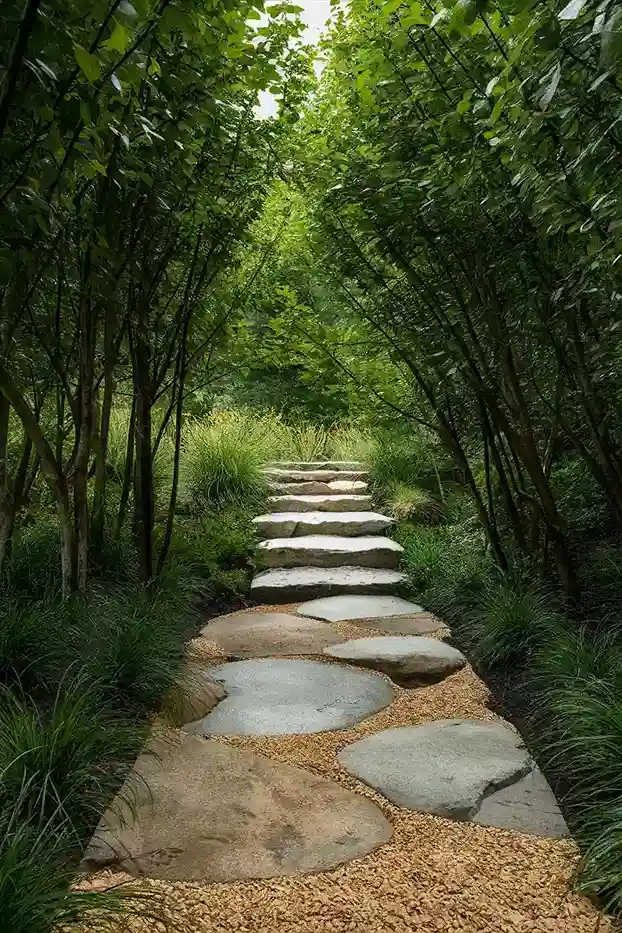
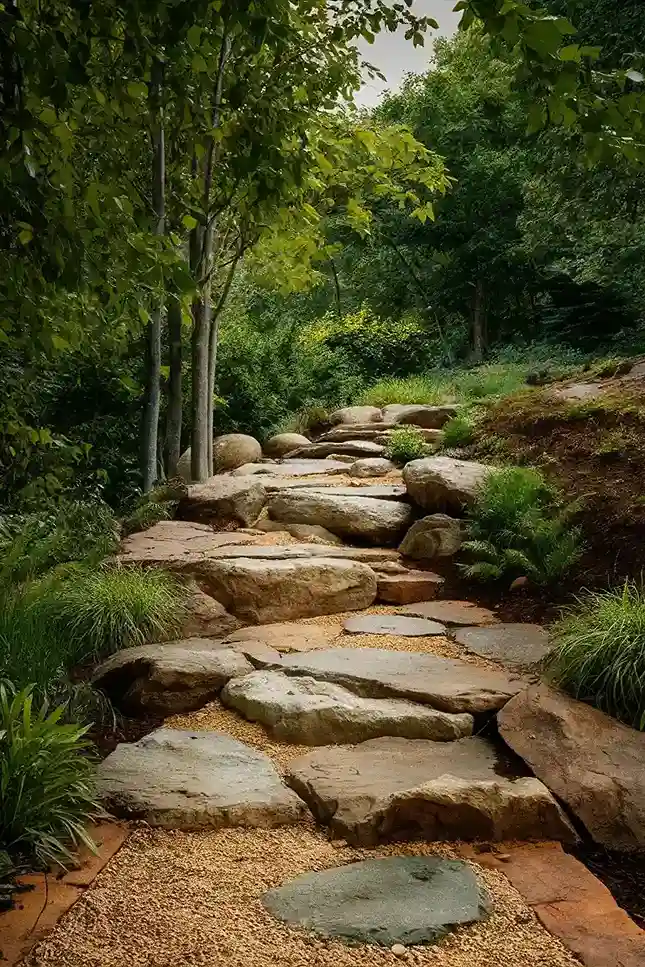
6. Flagstone Walkway

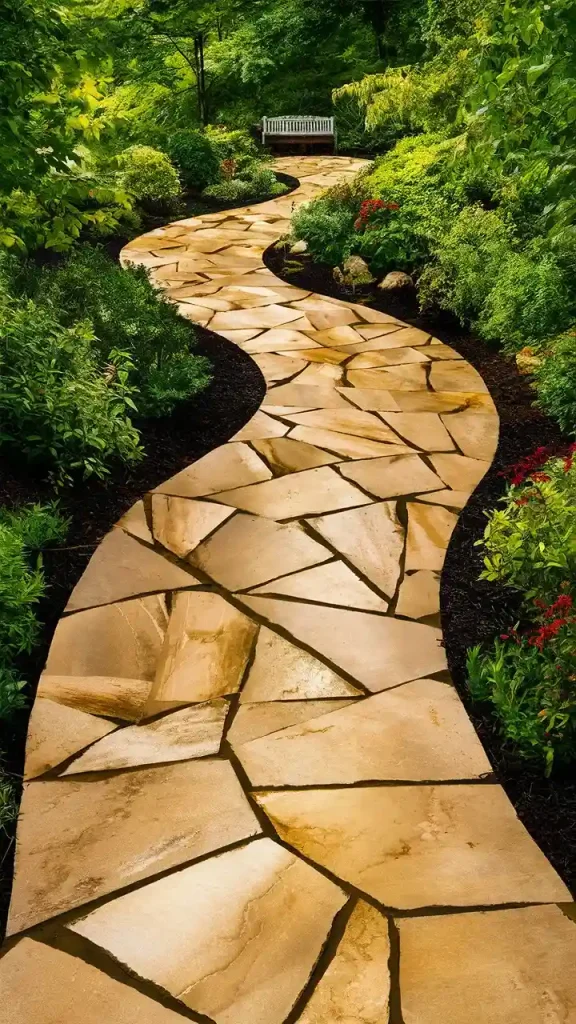

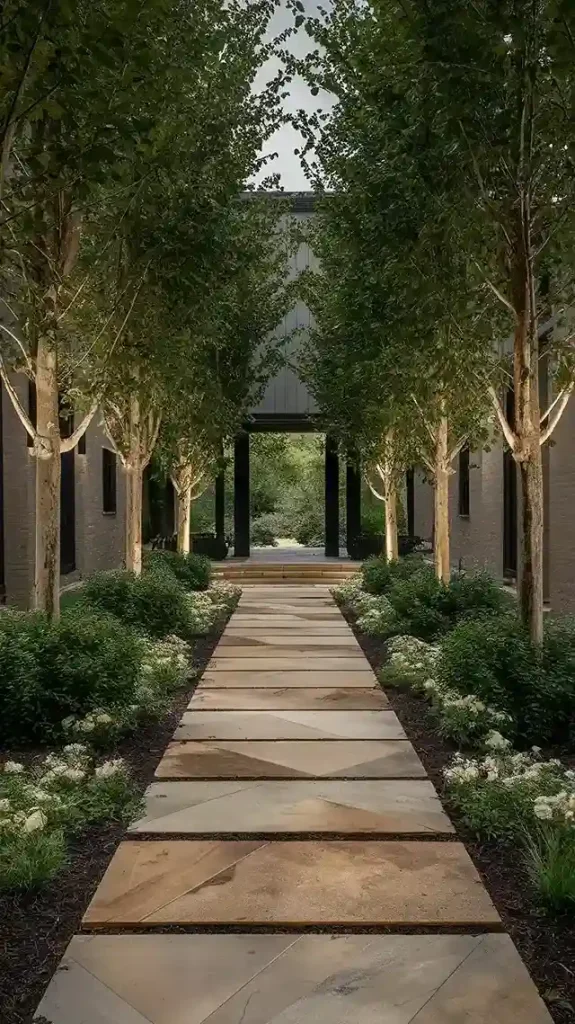
Why Choose Flagstone?
Flagstones provide a natural and elegant look. They are durable and can be laid directly on the ground.
How It Looks:
A flagstone walkway offers a sophisticated, natural appearance. The irregular shapes and earthy tones of the stones create a harmonious blend with the surrounding landscape.
How to Install:
- Outline your path and remove the grass.
- Lay a 2-inch layer of sand as a base.
- Arrange the flagstones and ensure they are level.
- Fill gaps with sand or gravel.
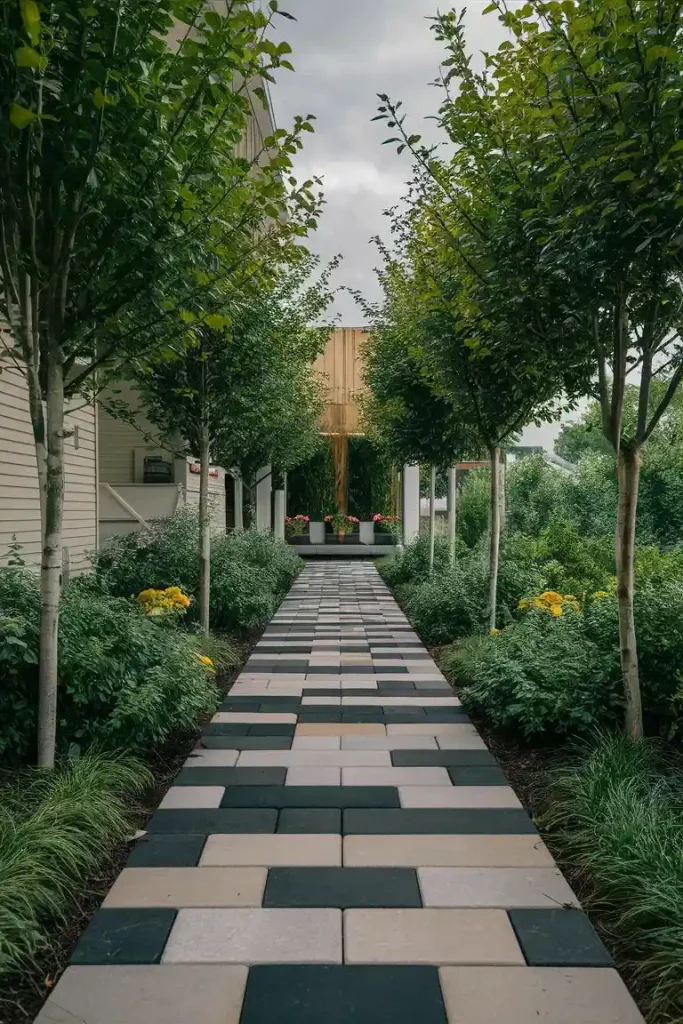
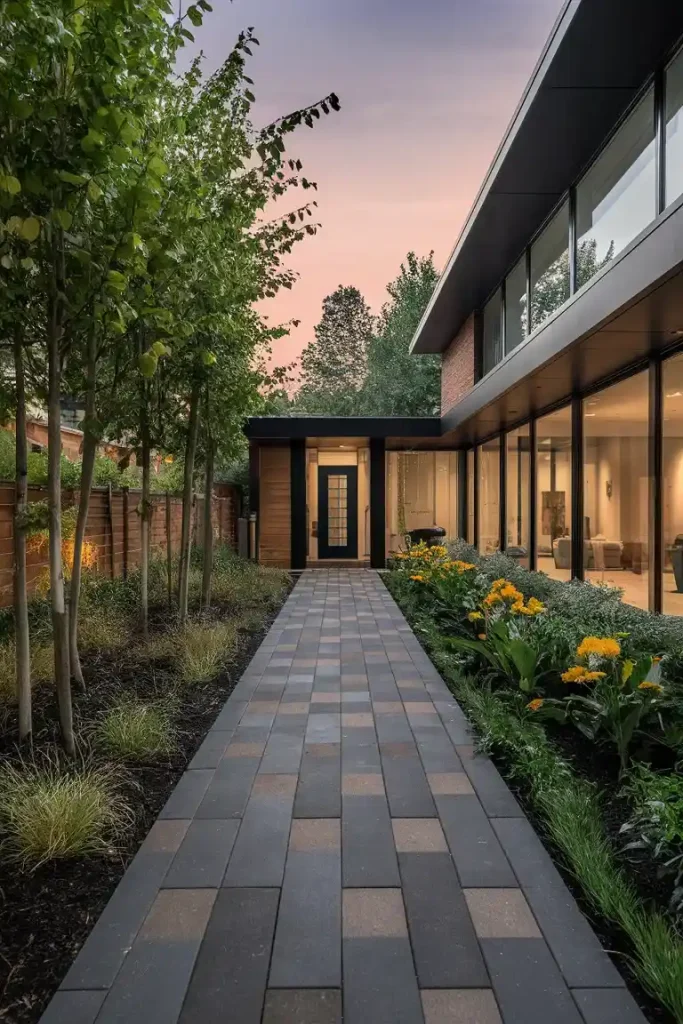
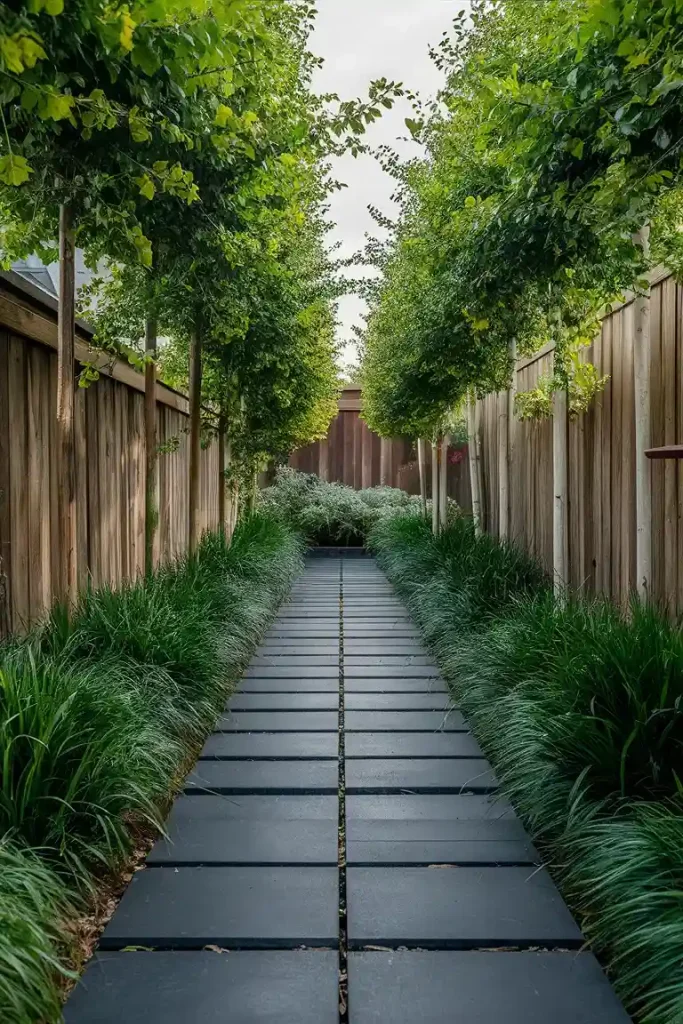
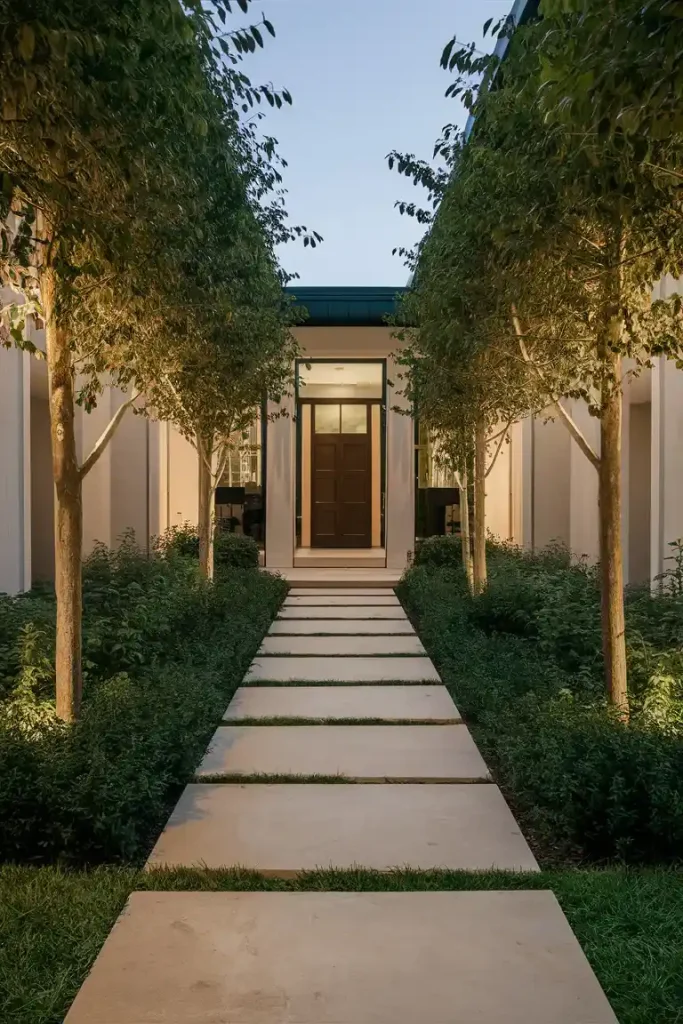
7. Concrete Pavers
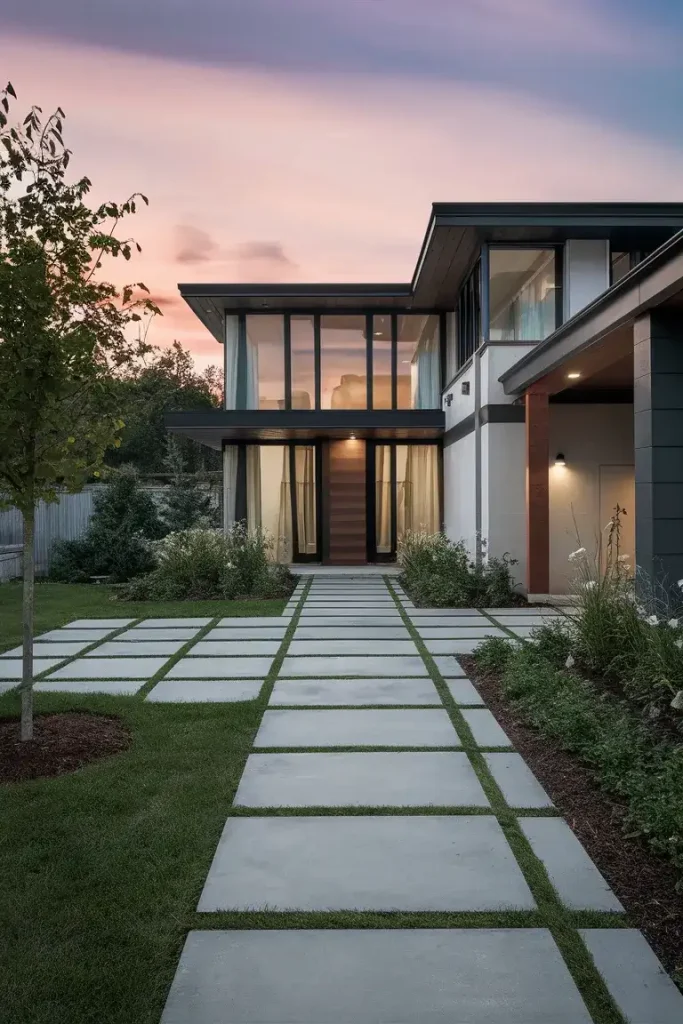
Why Choose Concrete Pavers?
Concrete pavers are versatile and come in various shapes and sizes. They are durable and easy to install.
How It Looks:
Concrete pavers provide a clean, modern look. They can be arranged in geometric patterns for a contemporary feel or in more organic layouts for a casual vibe.
How to Install:
- Outline your path and remove the grass.
- Lay a 2-inch layer of sand as a base.
- Arrange the pavers in your desired pattern.
- Fill gaps with sand and compact the pavers.
8. Pebble Mosaic
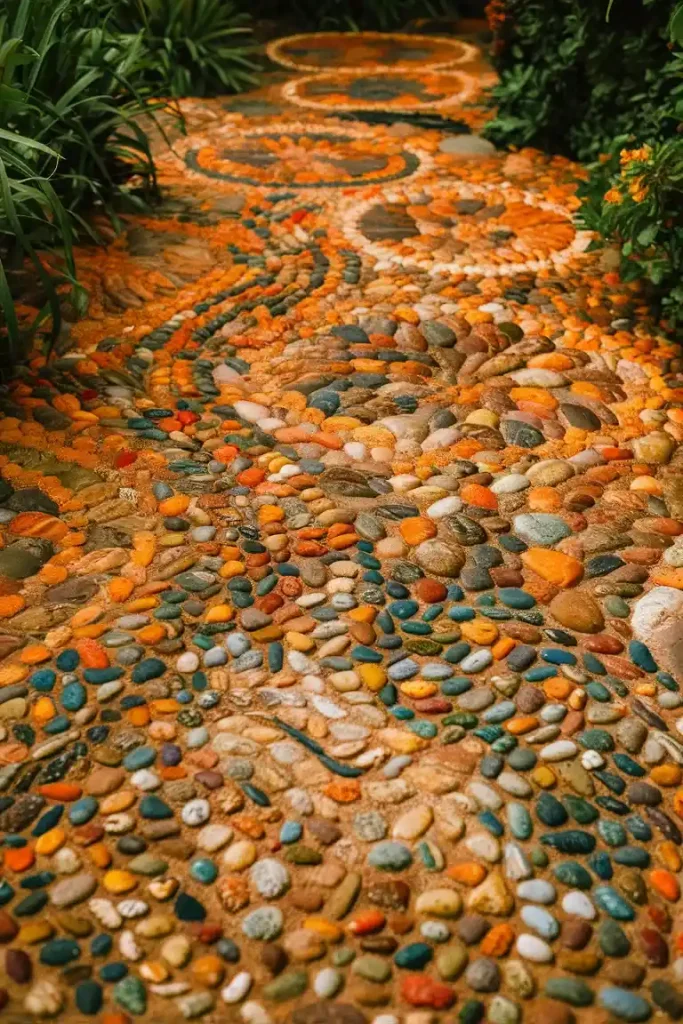
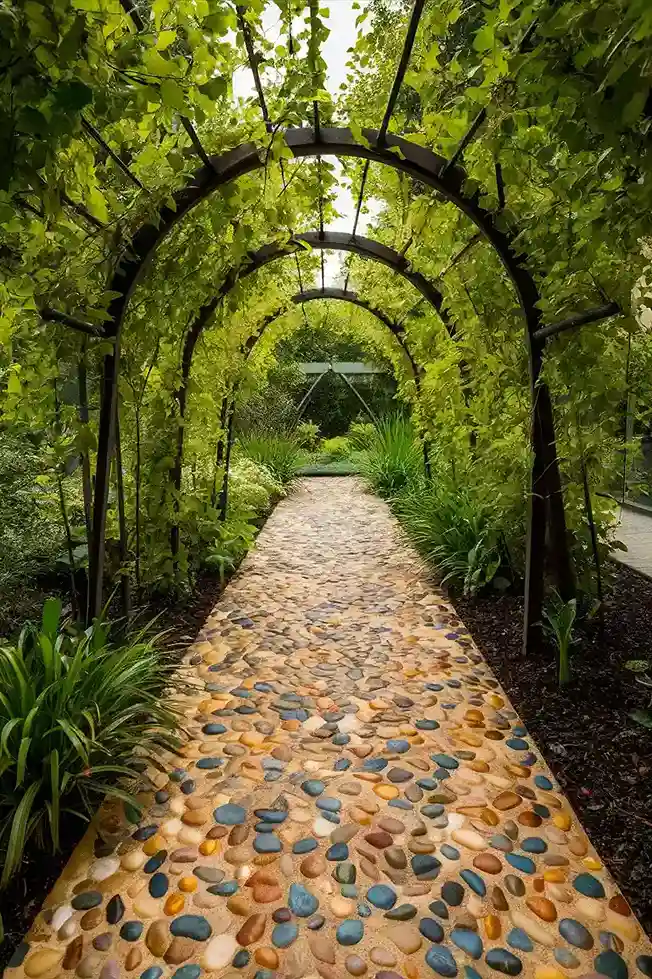
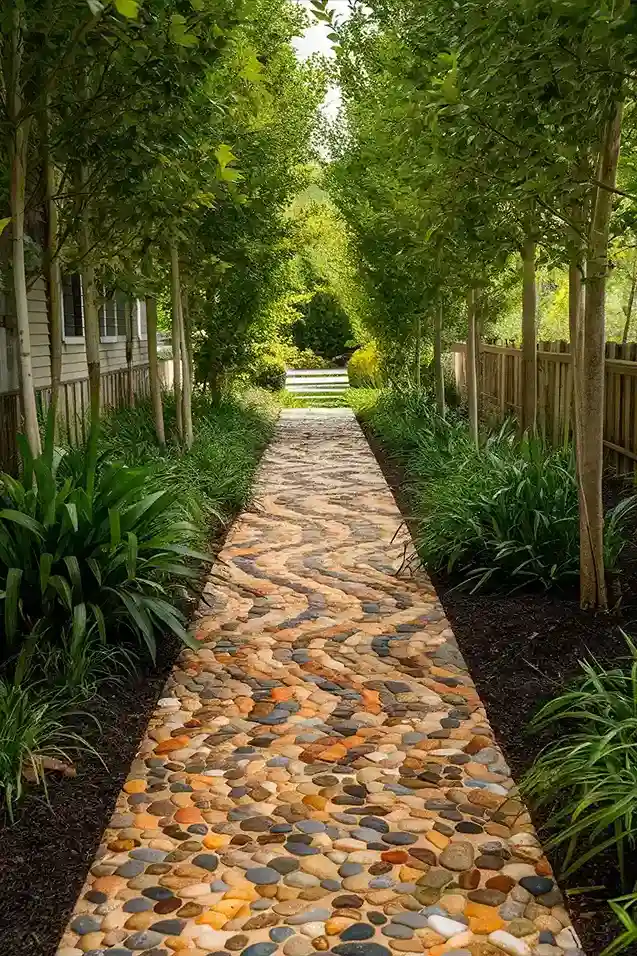
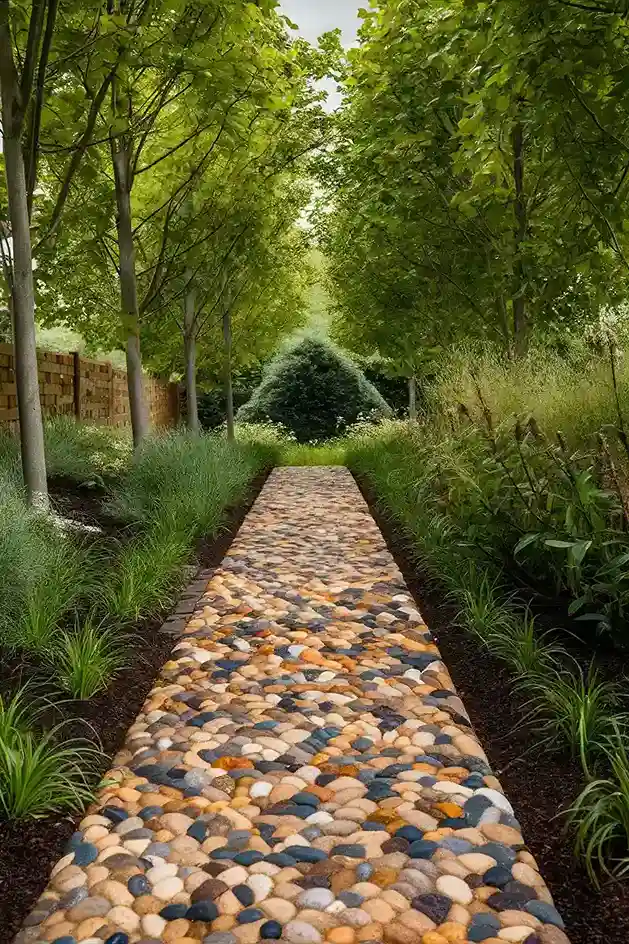
Why Choose Pebble Mosaic?
Pebble mosaics create a unique and artistic walkway. They add a personal touch to your garden.
How It Looks:
A pebble mosaic path is a work of art underfoot. The intricate patterns and natural colors of the pebbles create a visually stunning and tactile experience.
How to Install:
- Outline your path and remove the grass.
- Lay a 2-inch layer of sand as a base.
- Arrange pebbles in a mosaic pattern.
- Fill gaps with sand and compact the pebbles.
9. Wood Slice Path
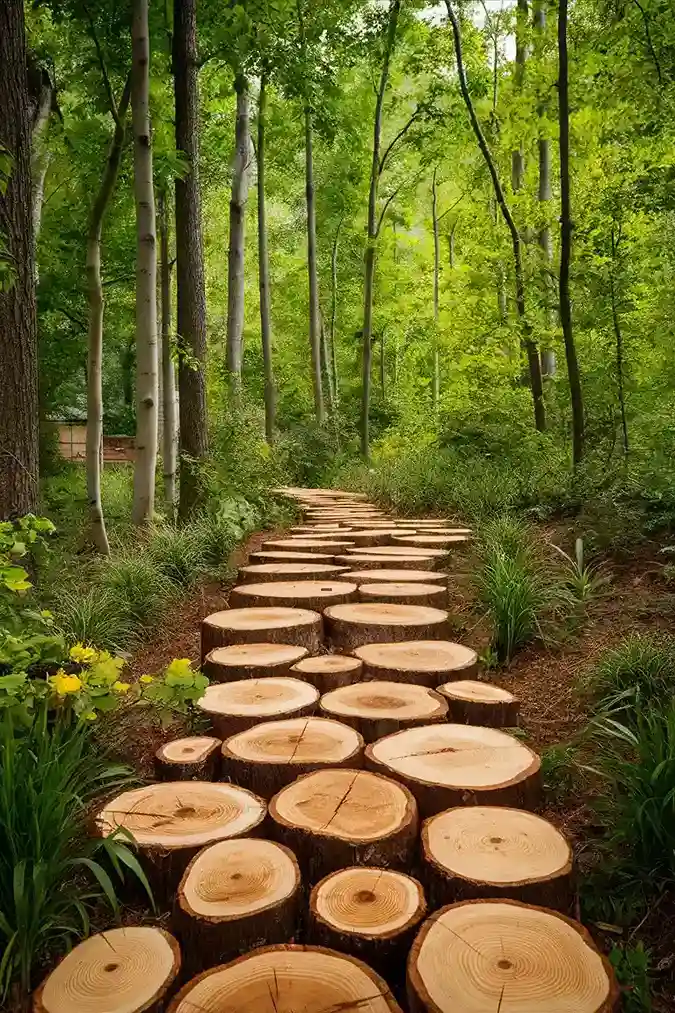
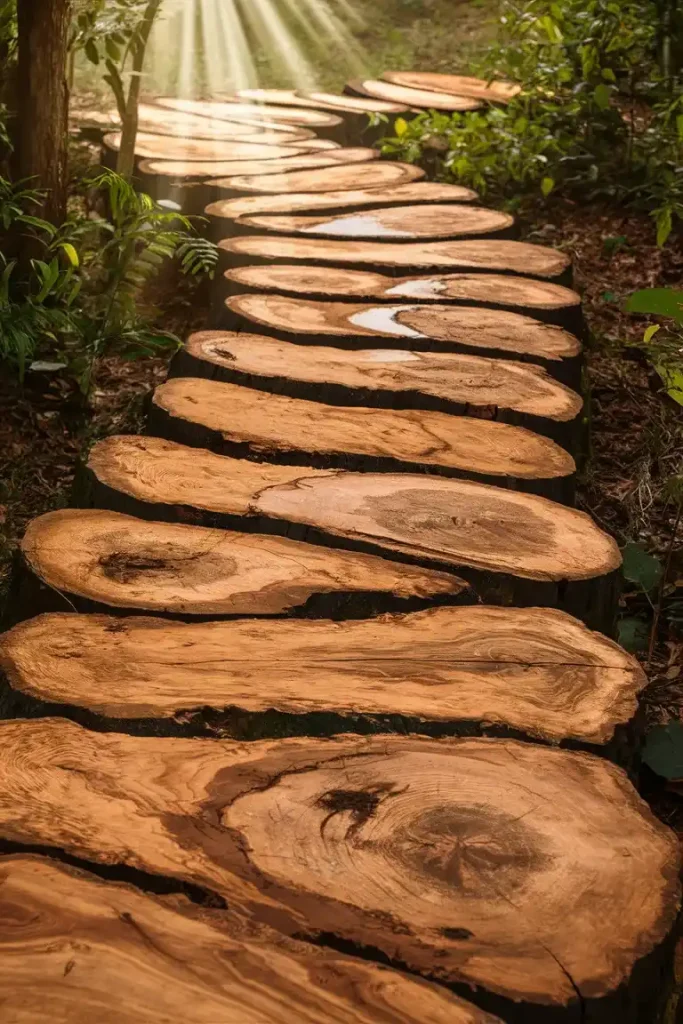

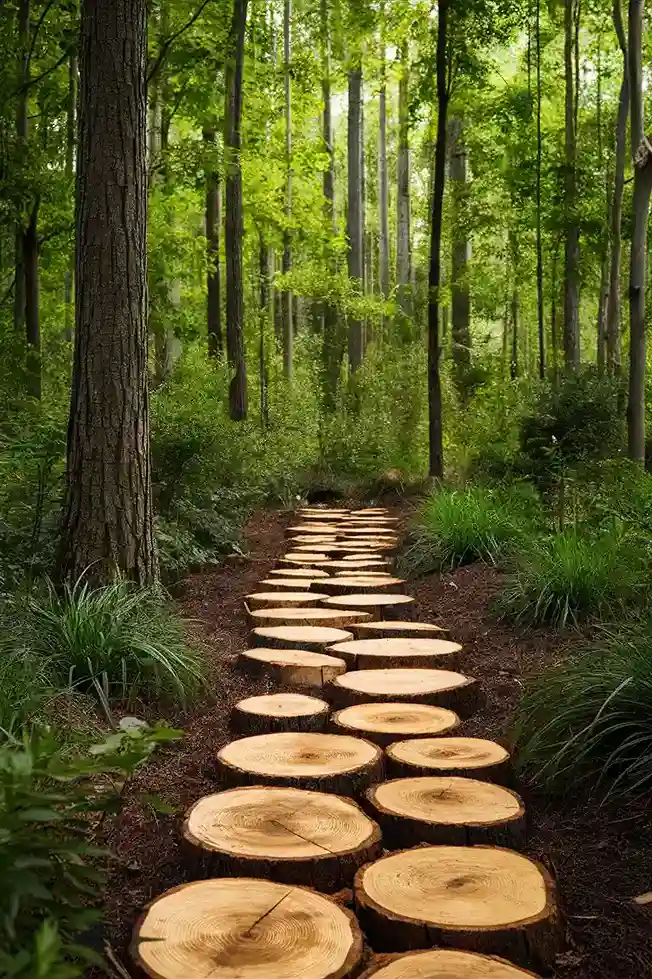
Why Choose Wood Slices?
Wood slices create a rustic path and are a great way to repurpose tree trunks or large branches.
How It Looks:
A wood slice path has a charming, woodland aesthetic. The natural rings and textures of the wood slices add visual interest and a touch of nature.
How to Install:
- Cut tree trunks or branches into slices.
- Lay the slices flat on a leveled ground.
- Fill gaps with gravel or mulch.
10. Recycled Rubber Pavers
Why Choose Rubber Pavers?
Rubber pavers made from recycled tires are eco-friendly and durable. They provide a cushioned surface.
How It Looks:
Rubber pavers offer a sleek, modern look. They come in various colors and patterns, allowing you to customize the appearance of your walkway.
How to Install:
- Outline your path and remove the grass.
- Lay a 2-inch layer of sand as a base.
- Arrange the rubber pavers and ensure they are level.
11. Crushed Shell Walkway
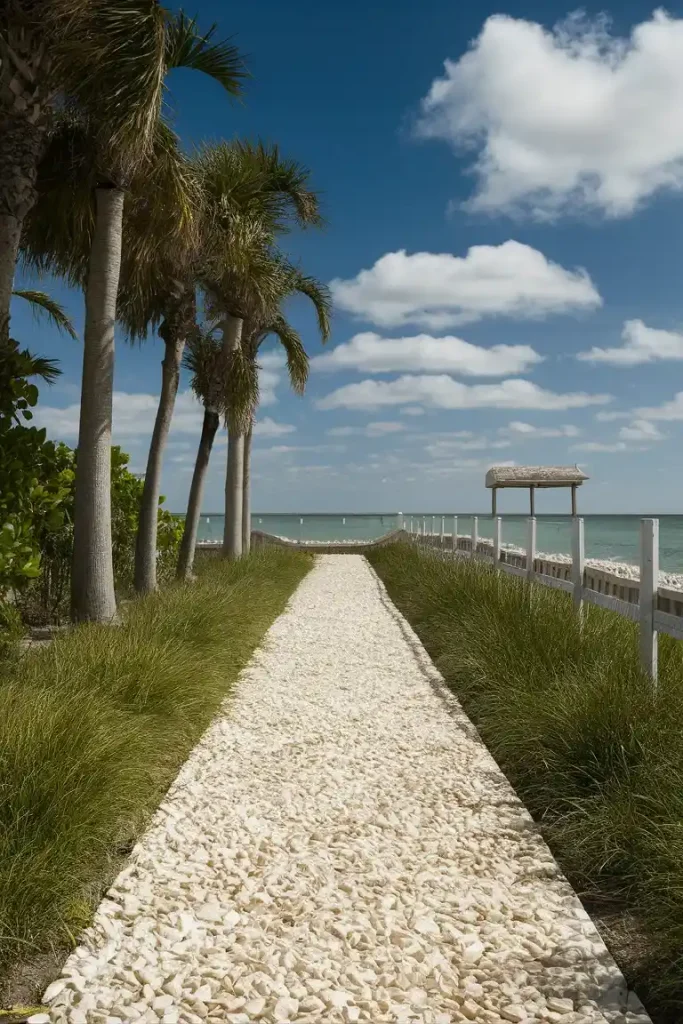
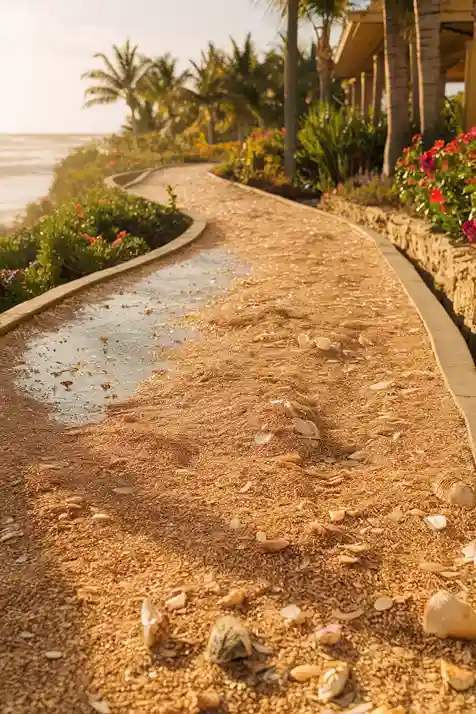
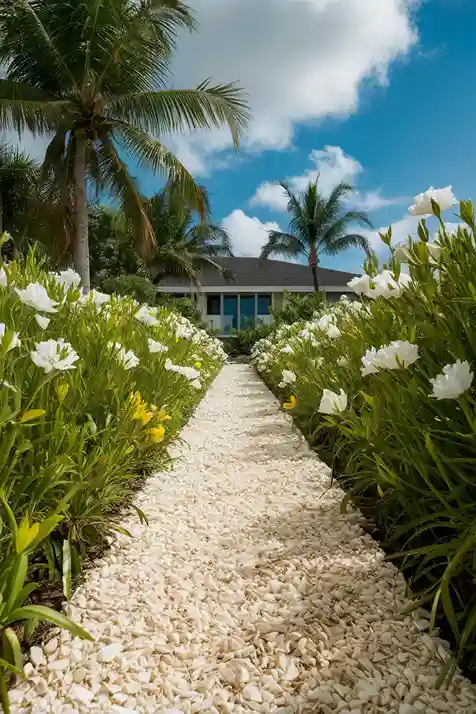
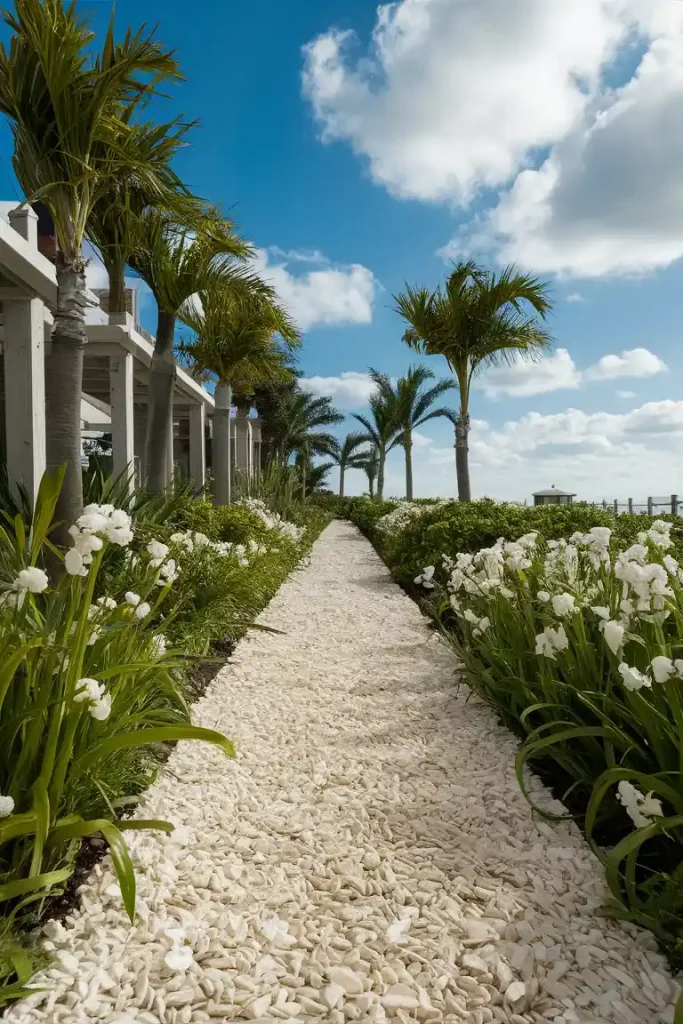
Why Choose Crushed Shells?
Crushed shells are a beautiful and unique material for a coastal-themed path. They are easy to spread and maintain.
How It Looks:
A crushed shell walkway has a bright, beachy appearance. The white or light-colored shells reflect sunlight, creating a luminous path that evokes the seaside.
How to Install:
- Outline your path and remove the grass.
- Lay a 2-inch layer of sand as a base.
- Spread a 2-inch layer of crushed shells evenly over the path.
12. Cobblestone Path
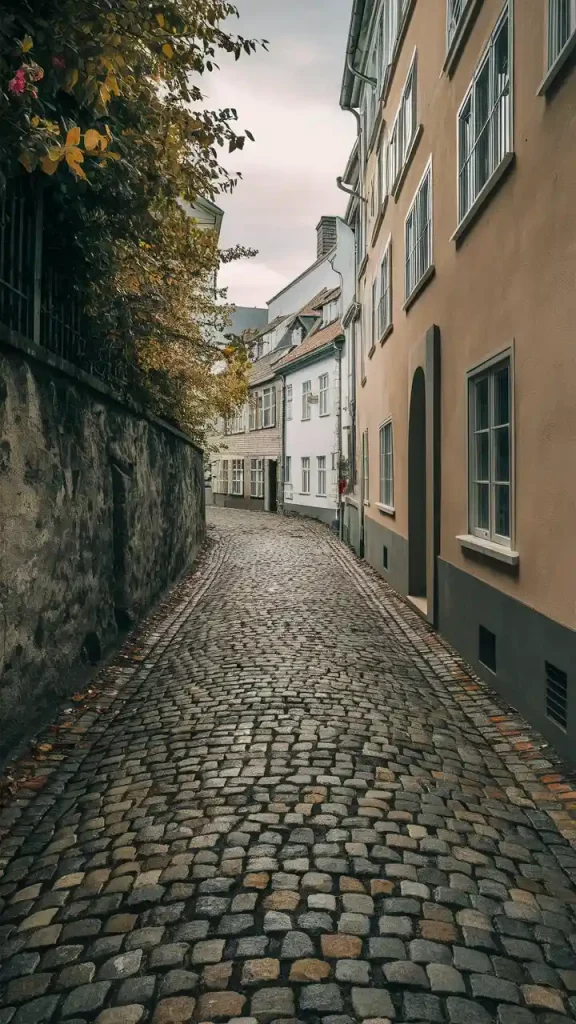
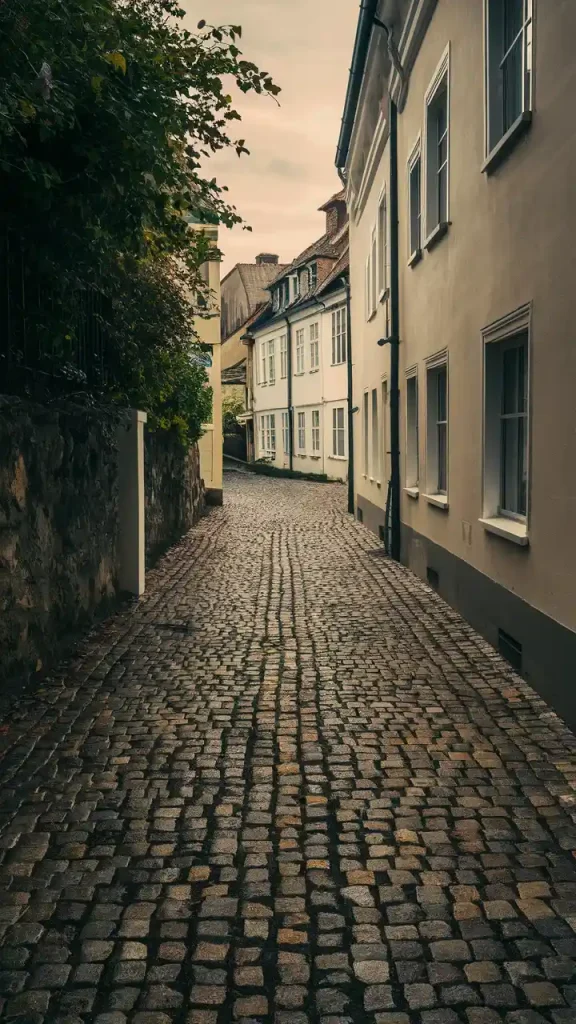
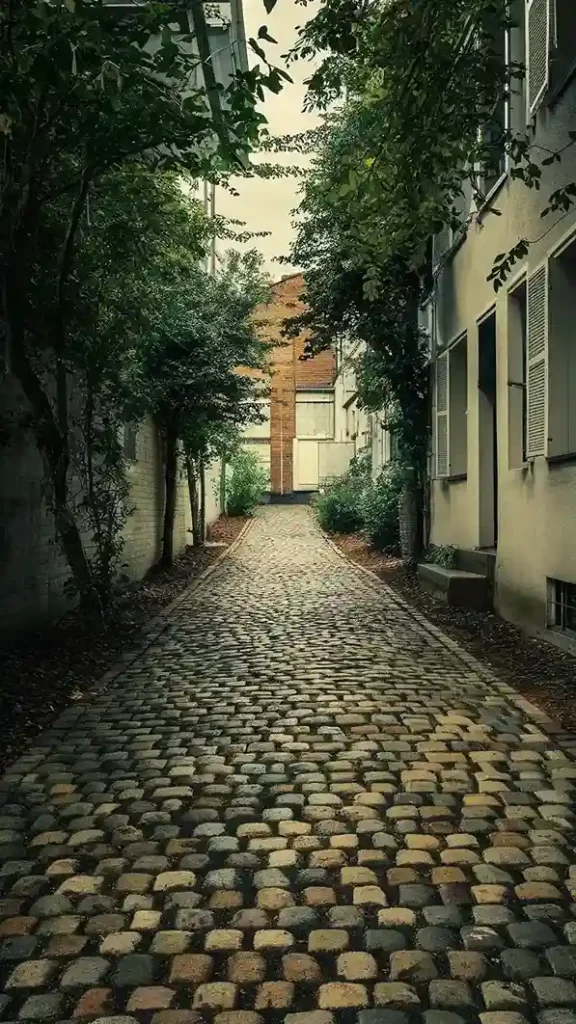
Why Choose Cobblestones?
Cobblestones create a timeless and sturdy walkway. They can be found at salvage yards or purchased new.
How It Looks:
A cobblestone path exudes old-world charm and durability. The rounded stones and varied colors create a picturesque, storybook feel.
How to Install:
- Outline your path and remove the grass.
- Lay a 2-inch layer of sand as a base.
- Arrange the cobblestones in your desired pattern.
- Fill gaps with sand and compact the cobblestones.
13. Grass Path with Stone Edging
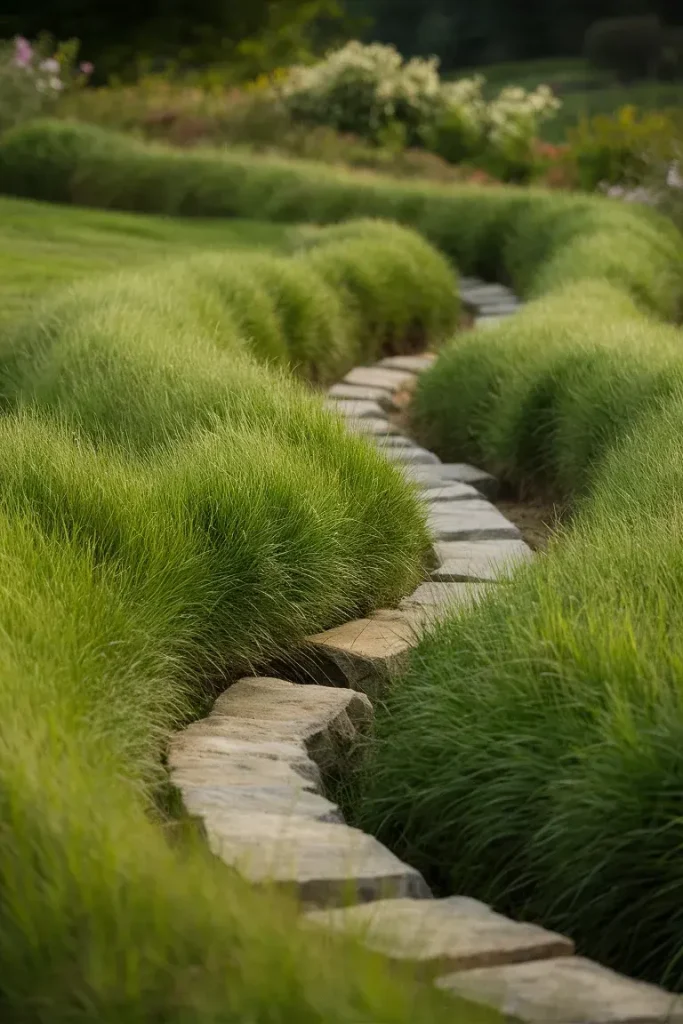

Why Choose Grass with Stone Edging?
A grass path with stone edging is a low-cost and natural-looking option. It’s easy to maintain and blends well with the landscape.
How It Looks:
A grass path with stone edging has a simple, natural beauty. The green grass contrasts with the solid stone edges, creating a defined yet organic look.
How to Install:
- Outline your path and remove the grass.
- Lay stones along the edges of the path.
- Plant grass seeds or sod in the path area.
14. Sandstone Slabs
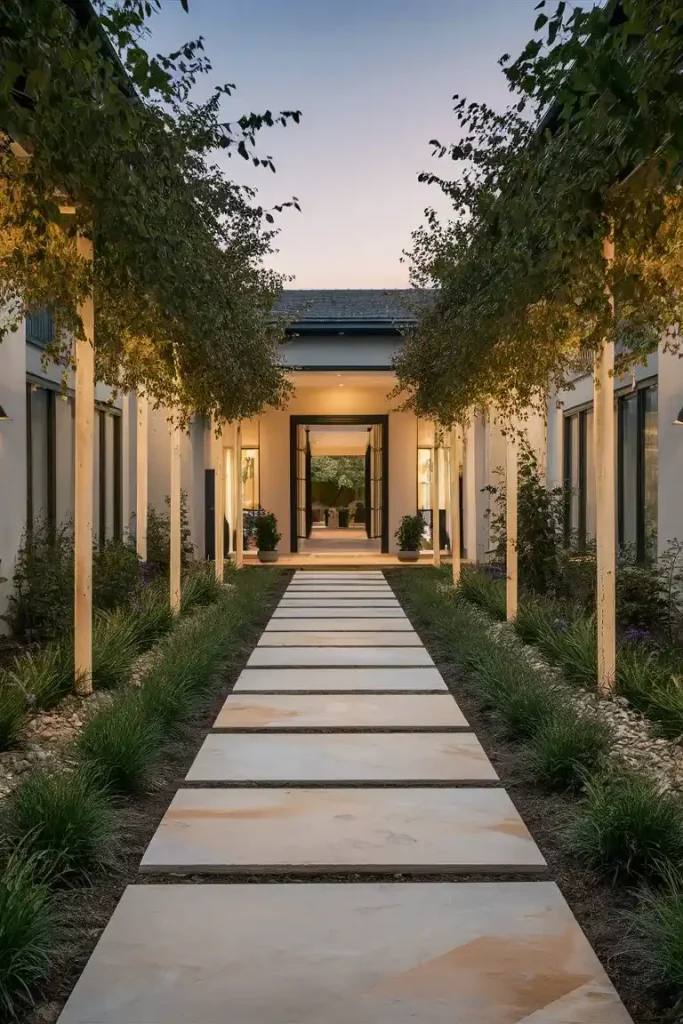
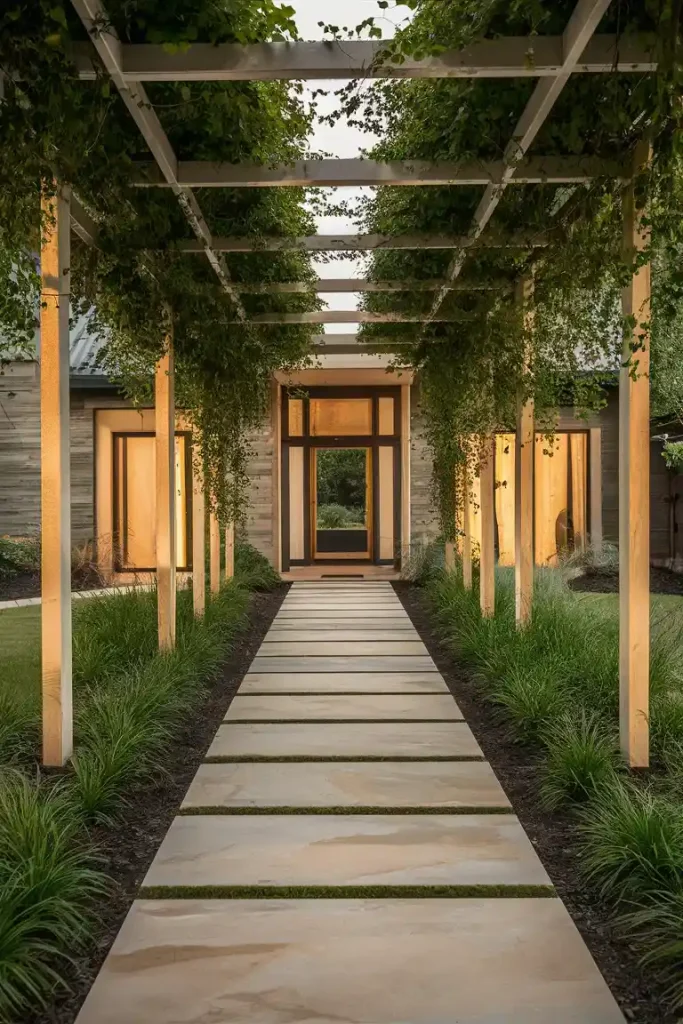
Why Choose Sandstone Slabs?
Sandstone slabs are durable and provide a natural and elegant look. They can be laid directly on the ground.
How It Looks:
A sandstone slab walkway offers a sophisticated, natural appearance. The warm, earthy tones of the sandstone blend seamlessly with the garden environment.
How to Install:
- Outline your path and remove the grass.
- Lay a 2-inch layer of sand as a base.
- Arrange the sandstone slabs and ensure they are level.
- Fill gaps with sand or gravel.
15. Recycled Concrete
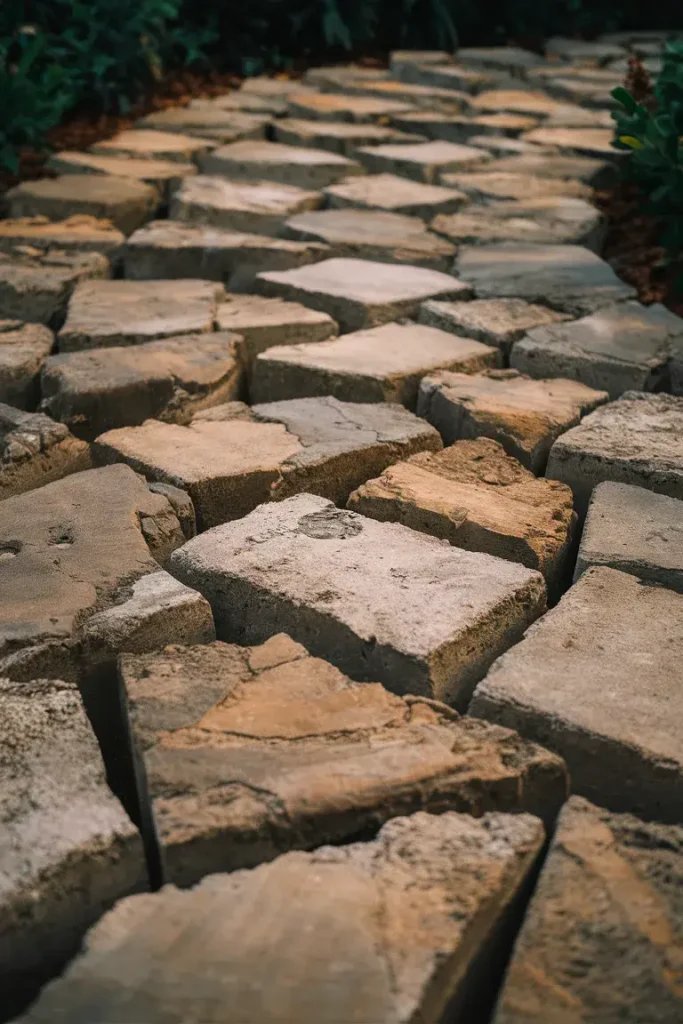
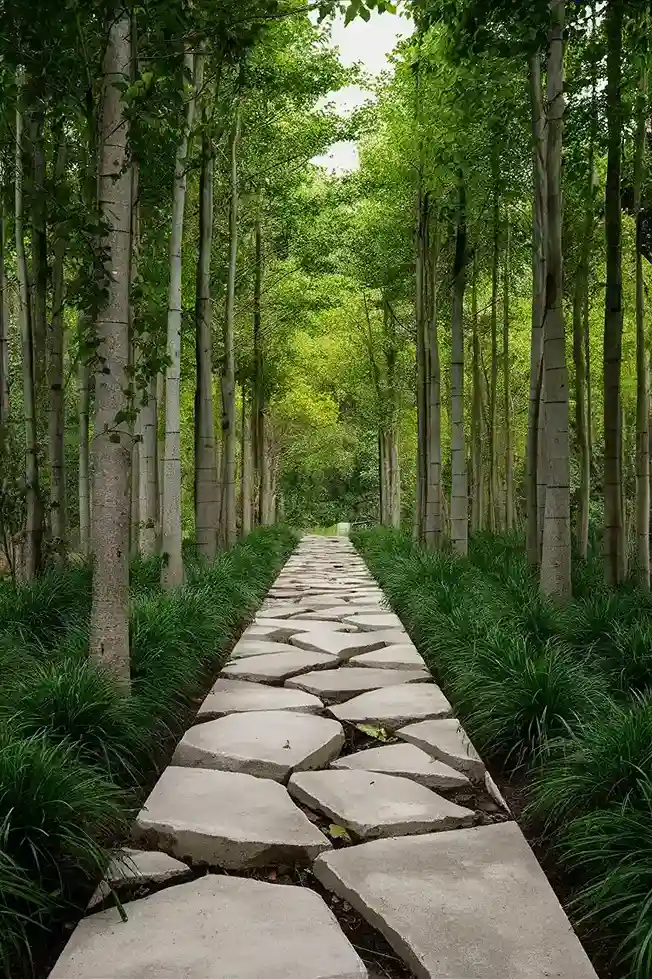
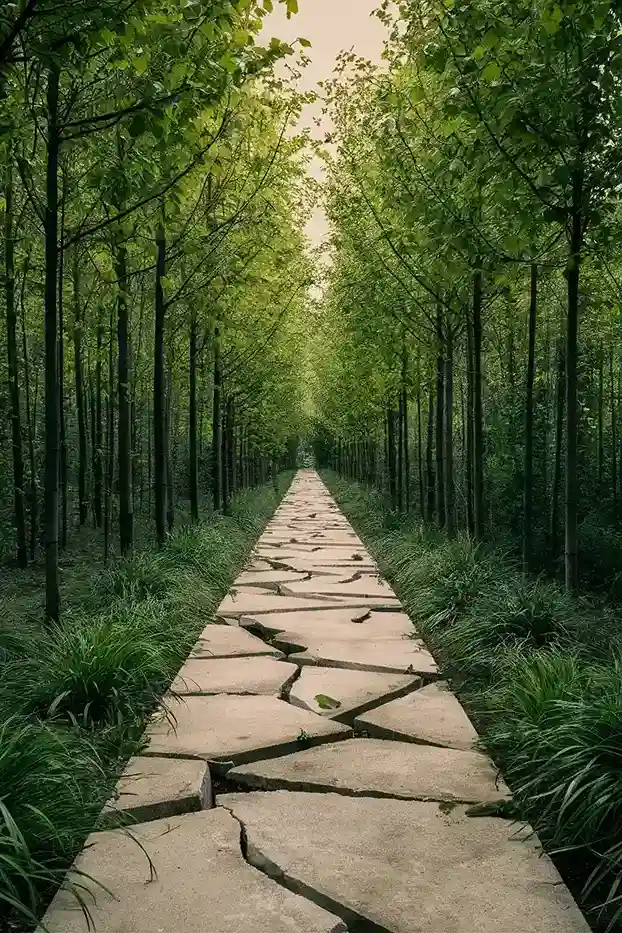
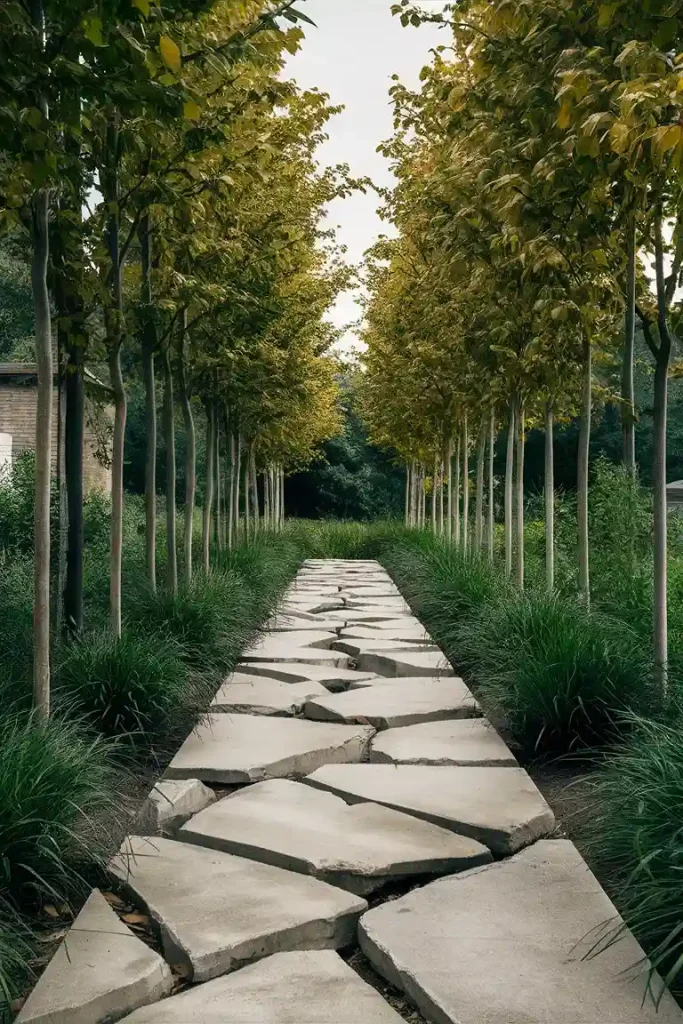
Why Choose Recycled Concrete?
Using broken pieces of concrete from old sidewalks or driveways is an eco-friendly and cost-effective option.
How It Looks:
A recycled concrete path has a rugged, industrial charm. The irregular shapes and textures of the concrete pieces create a unique, upcycled look.
How to Install:
- Outline your path and remove the grass.
- Lay a 2-inch layer of sand as a base.
- Arrange the concrete pieces in your desired pattern.
- Fill gaps with sand or gravel.
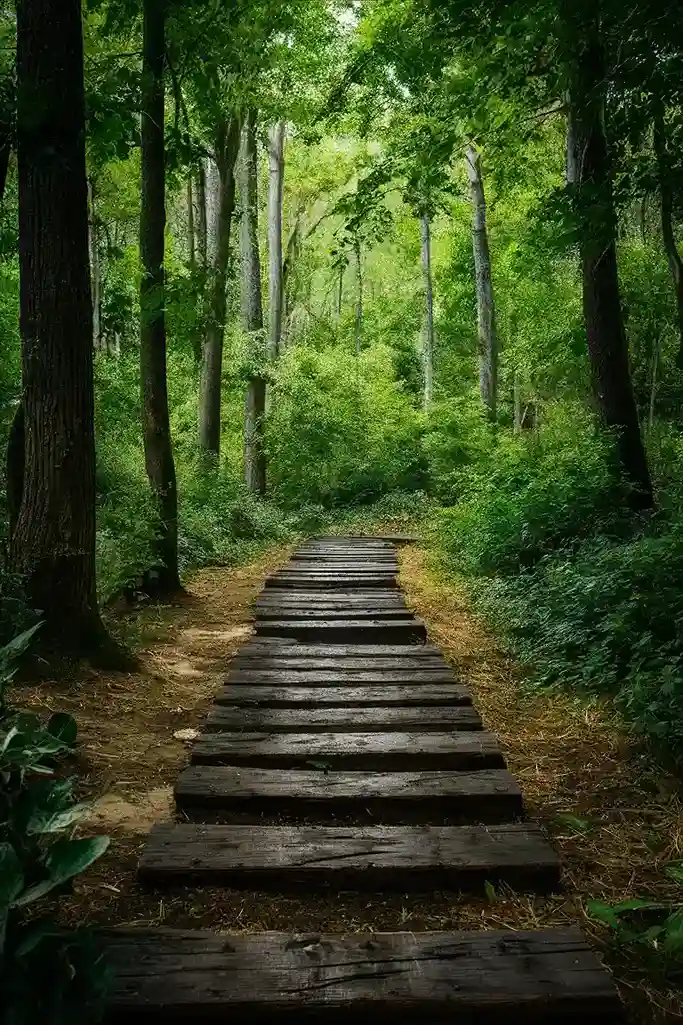
16. Log Path
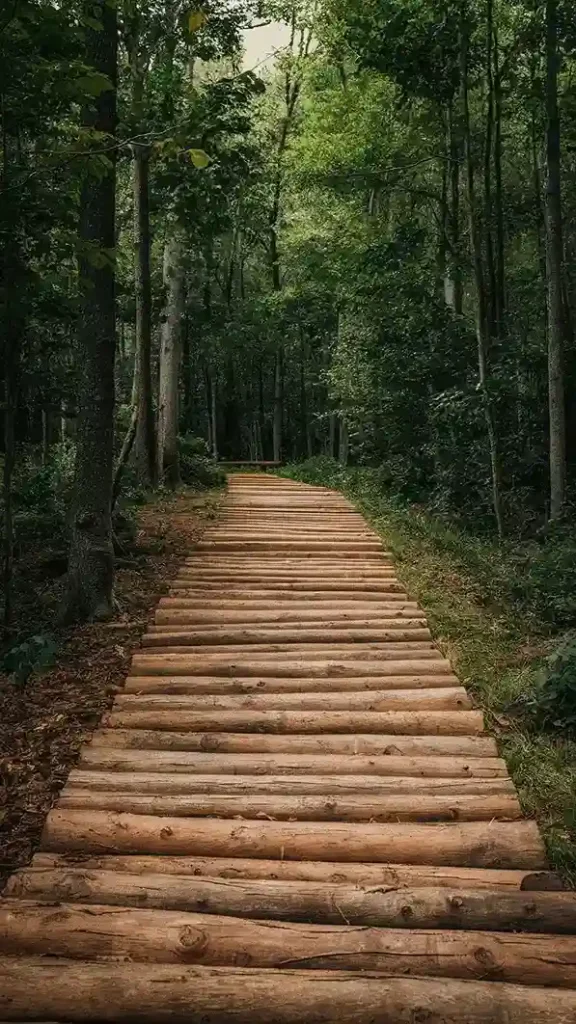
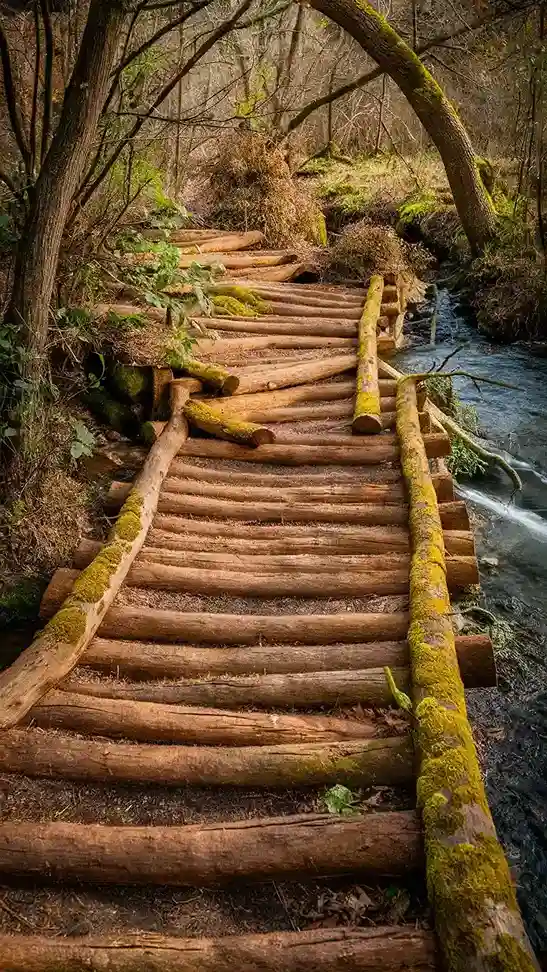
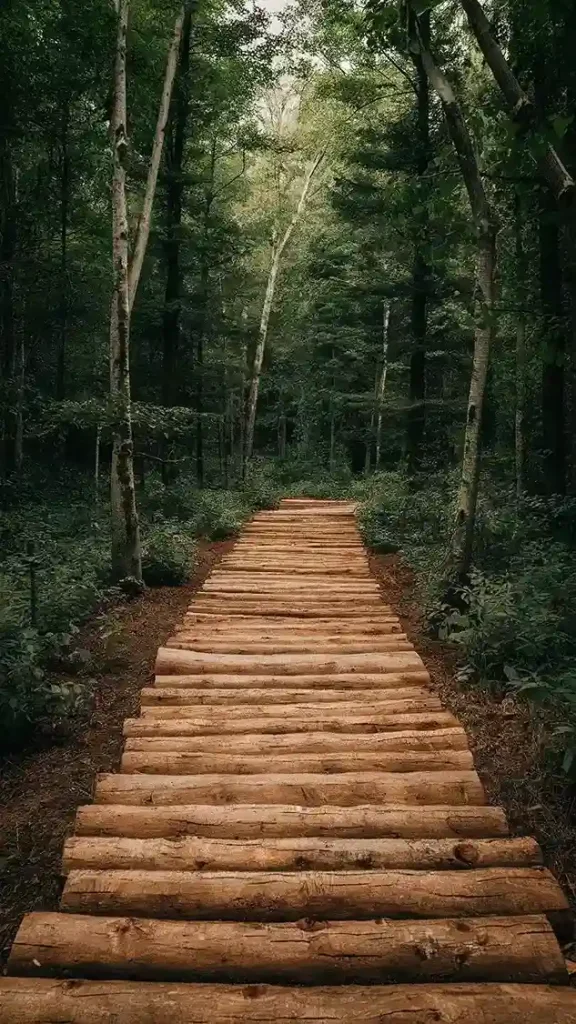
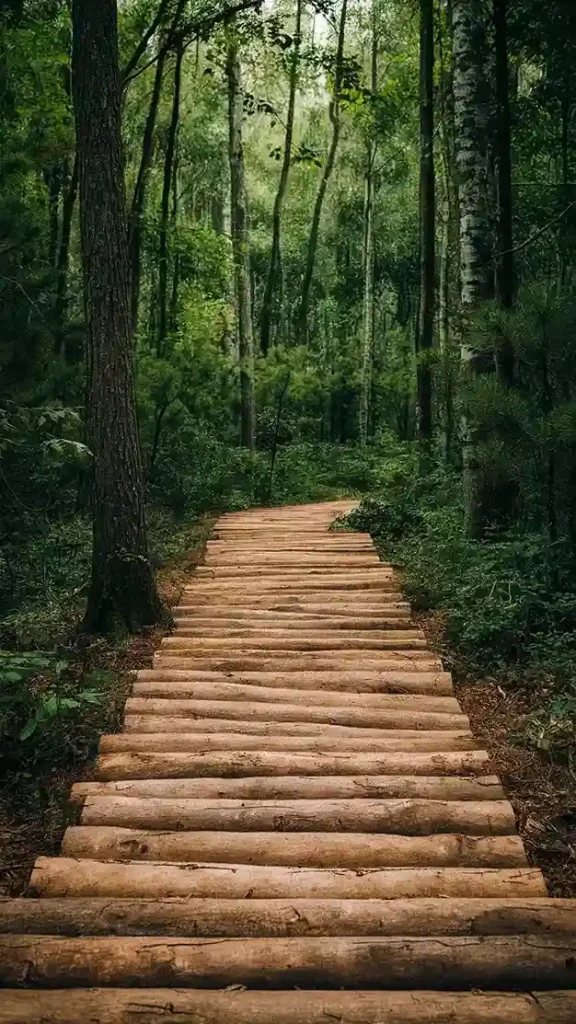
Why Choose Logs?
Laying logs horizontally creates a rustic path. This works well in wooded areas and adds a natural touch.
How It Looks:
A log path has a rustic, woodland aesthetic. The natural textures and colors of the logs blend seamlessly with a forested environment.
How to Install:
- Cut logs to the desired length.
- Lay the logs horizontally on a leveled ground.
- Fill gaps with gravel or mulch.
17. Mosaic Tile Path

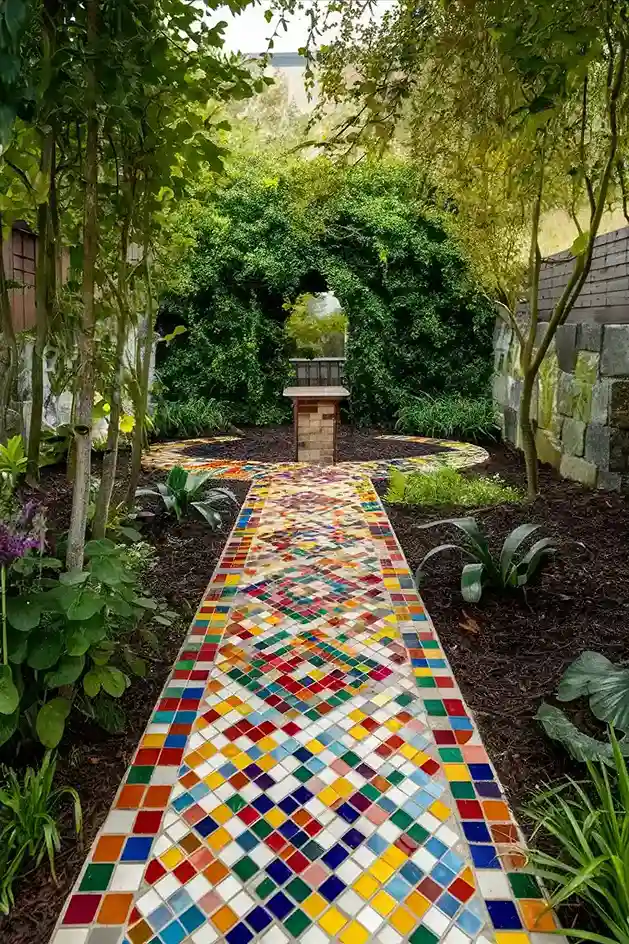
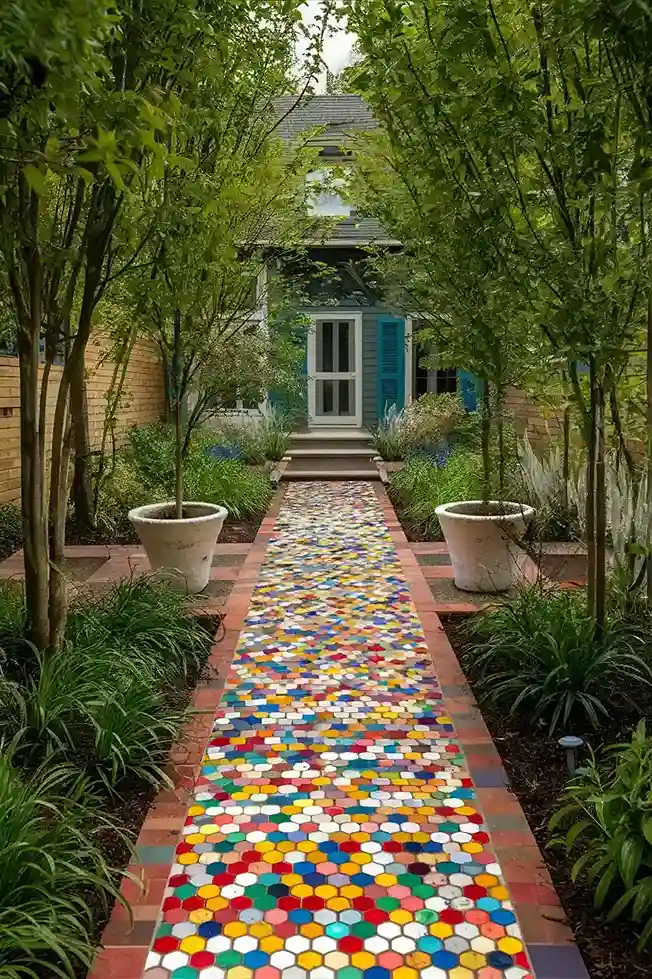
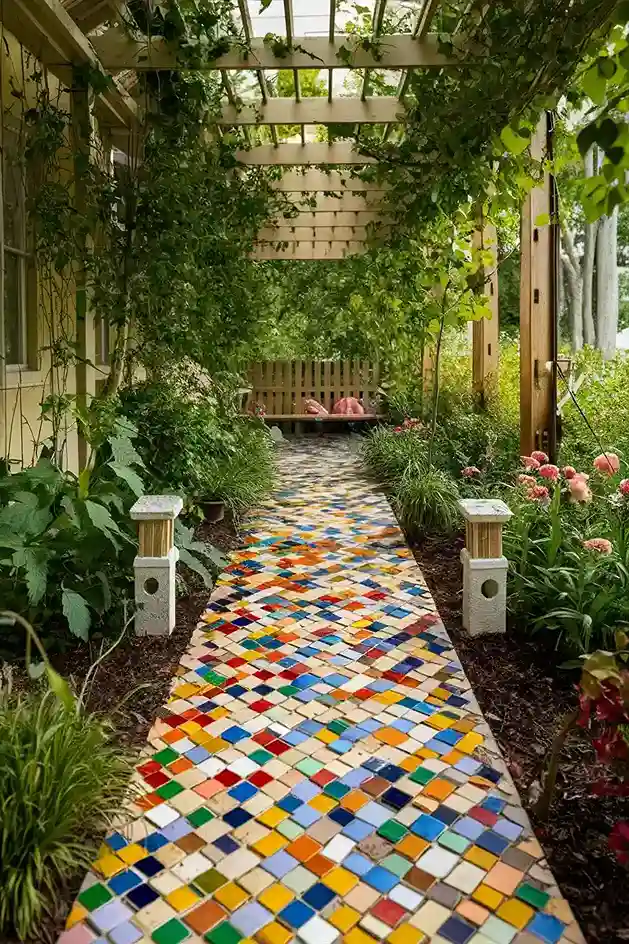
Why Choose Mosaic Tiles?
Using leftover tiles from other projects creates a colorful and artistic walkway. Arrange them in a mosaic pattern for a unique look.
How It Looks:
A mosaic tile path is a vibrant, artistic addition to your garden. The colorful tiles create intricate patterns that catch the eye and add a playful touch.
How to Install:
- Outline your path and remove the grass.
- Lay a 2-inch layer of sand as a base.
- Arrange the tiles in a mosaic pattern.
- Fill gaps with sand and compact the tiles.
18. Railroad Ties
Why Choose Railroad Ties?
Old railroad ties create a sturdy and rustic path. Be sure to treat the wood to prevent decay.
How It Looks:
A railroad tie path has a rugged, industrial look. The dark, weathered wood adds a sense of history and durability to your garden.
How to Install:
- Cut railroad ties to the desired length.
- Lay the ties horizontally on a leveled ground.
- Secure the ties with stakes or screws.
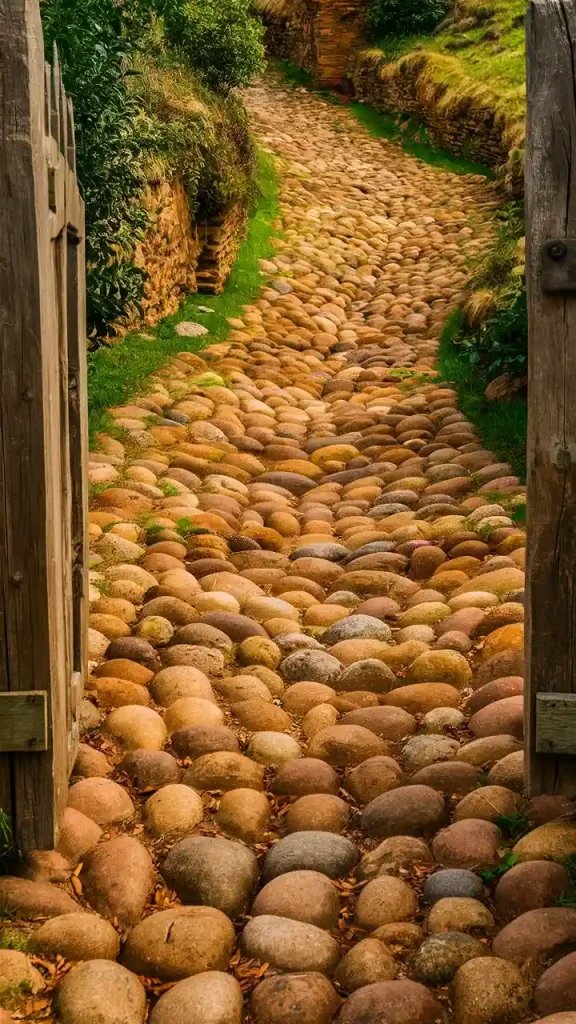
19. Stone and Gravel Mix
Why Choose Stone and Gravel?
Combining large stones with gravel creates a textured and visually interesting path. This mix provides stability and drainage.
How It Looks:
A stone and gravel mix path has a natural, rugged beauty. The large stones add visual interest, while the gravel provides a stable walking surface.
How to Install:
- Outline your path and remove the grass.
- Lay a 2-inch layer of sand as a base.
- Arrange large stones and fill gaps with gravel.
20. Concrete Stamps
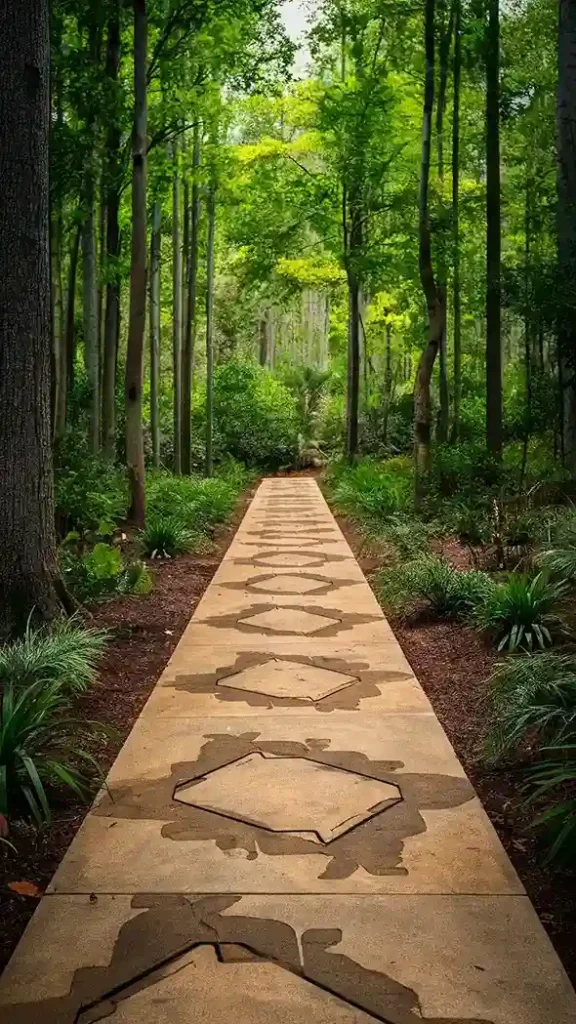
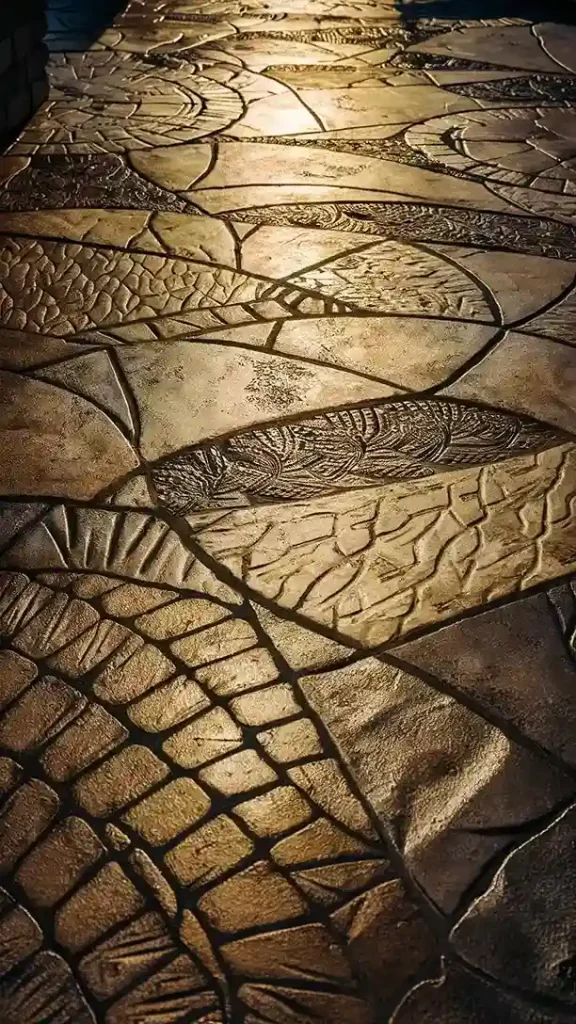

Why Choose Concrete Stamps?
Concrete stamps allow you to create patterns on a poured concrete path. This mimics the look of stone or brick at a lower cost.
How It Looks:
A stamped concrete path can mimic the appearance of more expensive materials like stone or brick. The patterns add texture and visual interest to the walkway.
How to Install:
- Pour concrete into the outlined path area.
- Use concrete stamps to create patterns before the concrete sets.
- Allow the concrete to cure.
21. Leaf-Imprinted Concrete
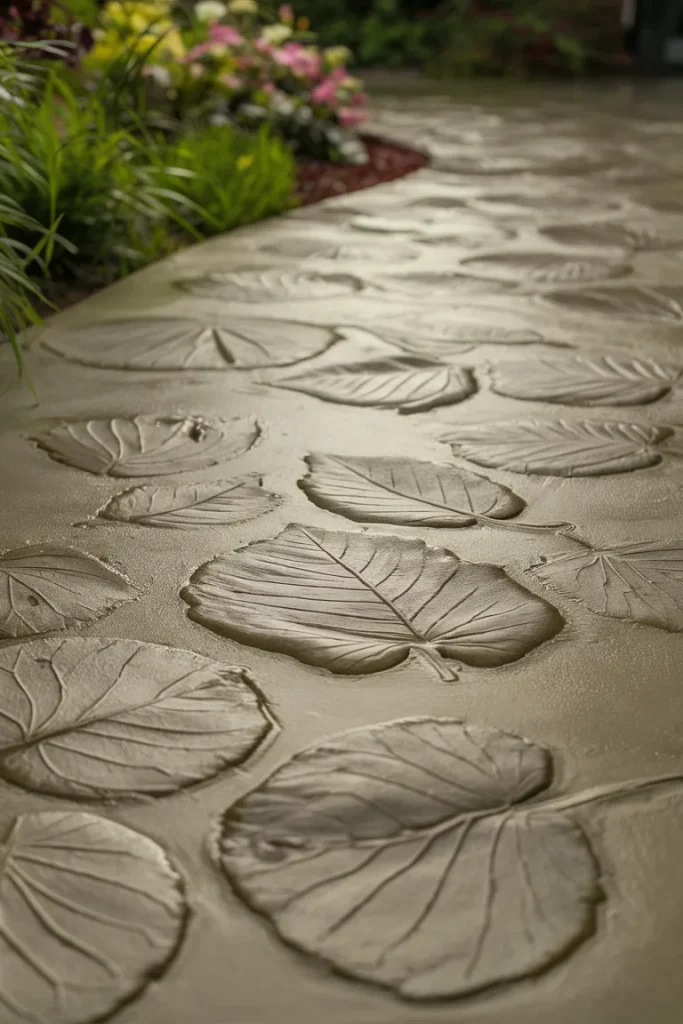
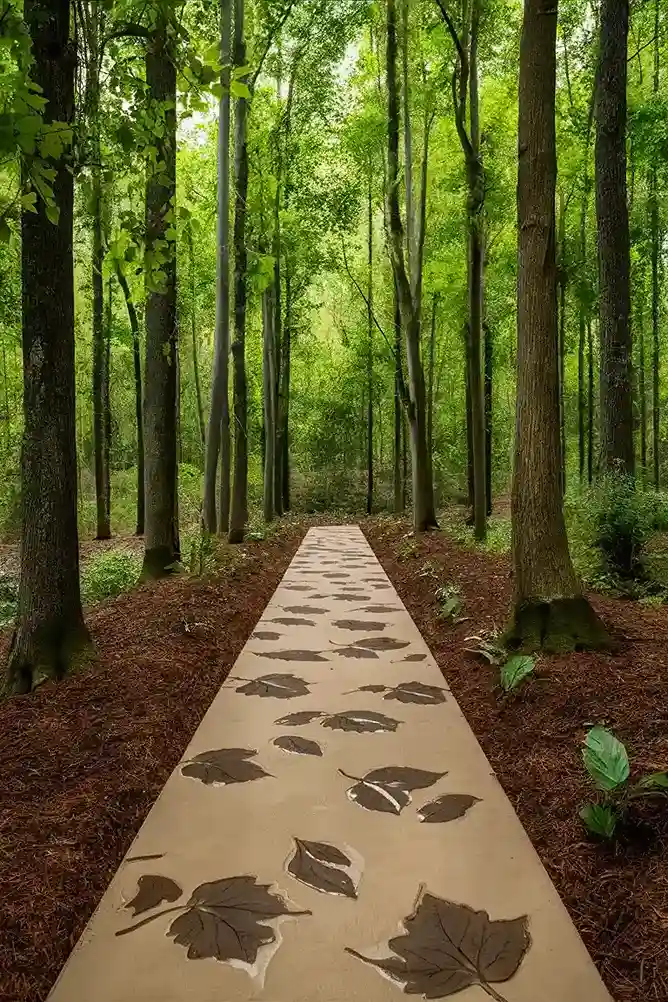
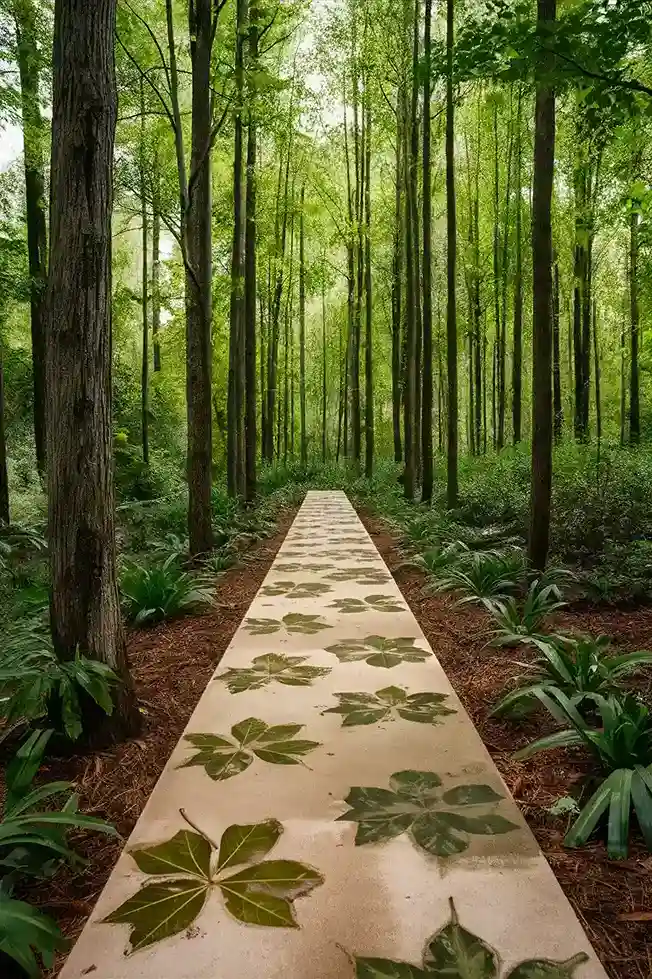
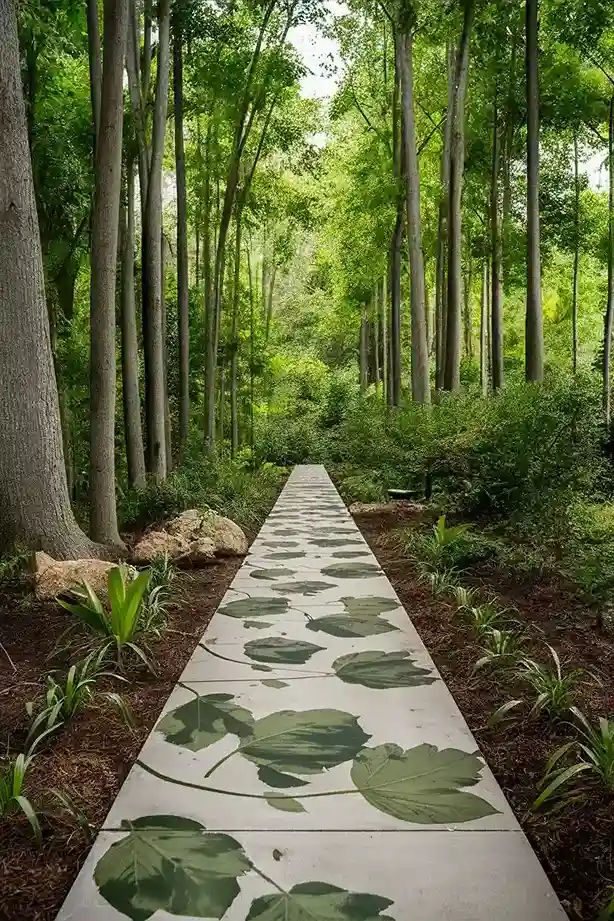
Why Choose Leaf Imprints?
Creating a nature-inspired path by pressing large leaves into wet concrete adds a unique and organic touch.
How It Looks:
A leaf-imprinted concrete path has a natural, artistic appeal. The leaf patterns add texture and a touch of nature to the walkway.
How to Install:
- Pour concrete into the outlined path area.
- Press large leaves into the wet concrete.
- Remove the leaves once the concrete sets, leaving the imprints.
These DIY walkway ideas offer a range of styles and materials to suit any budget and aesthetic. With a bit of effort and creativity, you can transform your outdoor space into a beautiful and inviting area. Happy crafting!